Jul
6
Written by:
Michael Washington
7/6/2012 3:00 PM


Visual Studio LightSwitch provides the fastest and easiest way to create Line-Of-Business, Forms-Over-Data applications. Previously LightSwitch produced only Silverlight applications. Now with LightSwitch in Visual Studio 2012, LightSwitch now allows you to communicate with its security and business layer through OData. There is an announced LightSwitch HTML Client currently in preview, but that uses JQuery Mobile, and therefore is targeted toward mobile devices such as tablets and cell phones. When one desires a full screen desktop HTML interface such as a DotNetNuke module, OData provides the necessary communication.
OData is a protocol used to expose and consume data over the web. It uses a common REST-like (representational state transfer) interface to communicate, rather than the usual pre-defined application specific interfaces used by traditional web services. OData is a project created by Microsoft. The home page for the project is at: http://www.odata.org.
As described in the article: LightSwitch Architecture: OData (John Rivard) (http://blogs.msdn.com/b/lightswitch/archive/2012/03/22/lightswitch-architecture-odata.aspx), OData allows CRUD (Create, Read, Update, Delete) operations. This allows you to have full data interaction when you use OData. In addition, OData provides a mechanism to query the data.
The Application

Basic CRUD functionality is demonstrated in the example application. It allows you to create new call records in the form at the bottom, and they display them in the grid at the top. You can update and delete the items in the grid (note: OData does support paging, but that was not implemented in this example).

LightSwitch has many features that allow you to easily implement business rules, security rules, and business types. In this example, the Phone Number business type, is set for the PhoneNumber field in the PhoneCall table in LightSwitch.

Without the need to write a single line of code, the business type is enforced when calling the LightSwitch application through OData from DotNetNuke.
The Previous Application

We start with the application created in the article: Easy DotNetNuke LightSwitch Deployment.

This article describes the steps needed to point the LightSwitch application to the DotNetNuke database and security when you publish it.

However, it produces a Silverlight application that runs in an IFrame in a DotNetNuke site. This actually provides the best user interface as far as performance, but when you must have an HTML page you can create one using OData.
Creating The DotNetNuke OData Service Reference
When you create an OData module using server side code, you need to create a service reference, and that creates a proxy class that you use to communicate with the OData service. In a non-DotNetNuke project you would simply add the service reference. With a DotNetNuke module, you need to add the service reference in an external project so that it creates an assembly (a .dll) that you can package with the module when you move your code from development to production.
To create a DotNetNuke module, you need to set up your DotNetNuke development environment. Use any method you are comfortable with. We are using the latest DotNetNuke 6 for this example, but here are some articles I created for DotNetNuke 4 and 5 that I still use:
Note: for questions on developing DotNetNuke modules, see the following forums: http://www.dotnetnuke.com/Resources/Forums/GroupID/92.aspx.

In order for DotNetNuke to call LightSwitch, you need the ASP.NET OData libraries. You should have OData installed on your machine if you have the latest service pacs, otherwise you can get it from here: http://msdn.microsoft.com/en-us/data/ee720179.
 .
.
Open your DotNetNuke development site in Visual Studio 2010. If Visual Studio asks to upgrade the Target Framework to ASP.NET 4.0 say no. A DotNetNuke site should only be upgraded to ASP.NET 4.0 using the method described here: http://www.dotnetnuke.com/Resources/Blogs/EntryId/2619/Upgrading-DotNetNuke-to-ASP-NET-4-0.aspx (note: at the time of that post OData did not exist for ASP.NET 4.0. We will use ASP.NET 3.5 in this tutorial, but it will also work for any higher version).

Add a new project to the Solution.

Add a new Class Library.

Delete the Class1.cs file that is created.

In the Properties for the project, set the Framework to 3.5.

Select Add Reference.

Add a reference to System.Web.

Add a Service Reference.

The address to the LightSwitch OData service is the web address plus ApplicationData.svc (see Learn How To Make OData Calls In LightSwitch 2011).

We enter that web address in the Address box in the Service Reference dialog.

When the authentication box pops up click Yes.

Because we have forms authentication enabled in the LightSwitch application, it requires us to enter a user name and password that is able to access the service. Because we have the LightSwitch applications Web.config file configured to use the DotNetNuke site for authentication, we simply use a valid account from the DotNetNuke site.
Note: The authentication boxes will pop up again. You need to repeat the process twice.

The service will be discovered and show in the Services box. Enter a Namespace and click OK.

The service will be created.

Add a new class file to the project.
Use the following code:
using System;
using System.Collections.Generic;
using System.Linq;
using System.Text;
using System.Data.Services.Client;
using System.Net;
using System.Threading;
using System.IO;
using System.Security;
using System.Web;
using Microsoft.VisualBasic;
using System.Web.Security;
namespace CallLogOData.wsCallLogOData
{
    public partial class ApplicationData
    {
        partial void OnContextCreated()
        {
            this.SendingRequest +=
               new EventHandler<SendingRequestEventArgs>(OnSendingRequest);
        }
        void OnSendingRequest(object sender, SendingRequestEventArgs e)
        {
            // Get the Forms auth cookie
            var AuthCookie = HttpContext.Current.Request.Cookies[FormsAuthentication.FormsCookieName];
            if (AuthCookie != null)
            {
                Cookie objCookie = new Cookie();
                objCookie.Domain = HttpContext.Current.Request.Url.DnsSafeHost;
                objCookie.Expires = AuthCookie.Expires;
                objCookie.HttpOnly = AuthCookie.HttpOnly;
                objCookie.Name = AuthCookie.Name;
                objCookie.Path = AuthCookie.Path;
                objCookie.Secure = AuthCookie.Secure;
                objCookie.Value = AuthCookie.Value;
                ((HttpWebRequest)e.Request).CookieContainer = new CookieContainer();
                ((HttpWebRequest)e.Request).CookieContainer.Add(objCookie);
            }
        }
    }
}
This is a partial class that will get the authentication cookie that the user gets when they log into DotNetNuke. The code creates and passes an authentication cookie on each OData call. This is done because the cookie type that OData understands is not the cookie type that the web browsers use (see: Calling LightSwitch 2011 OData Using Server Side Code).

Add a reference in the DotNetNuke project.

Add the reference to the OData proxy project.
The DotNetNuke module, to be created in the next step, will call this proxy to communicate with LightSwitch.

Also, add a reference in the DotNetNuke project to System.Data.Services.Client.
Note: This puts an entry in the web.config for “System.Data.Services.Client”. You would need to place that entry in the web.config of any other DotNetNuke site you need to use with OData.
Creating The DotNetNuke Module

Run your DotNetNuke site, and open it in a web browser.
log in as the Host account, and from the Host menu, select Extensions.

Hover over the Manage box and select Create New Module.
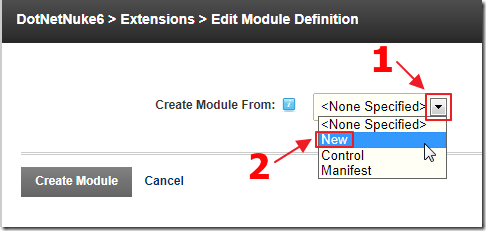
Select New.
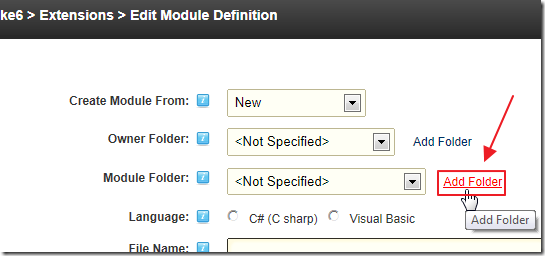
Add a Module Folder.
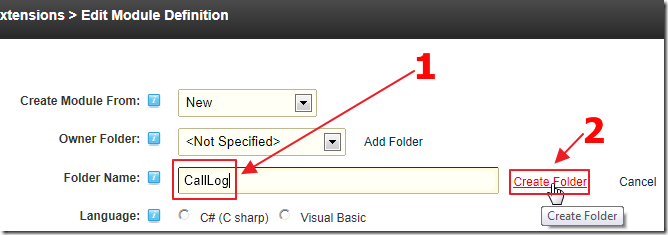
Name it CallLog.
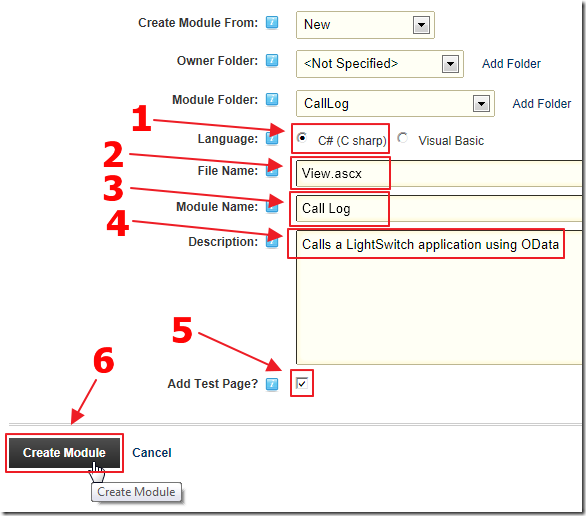
Fill in the remaining fields and click Create Module.
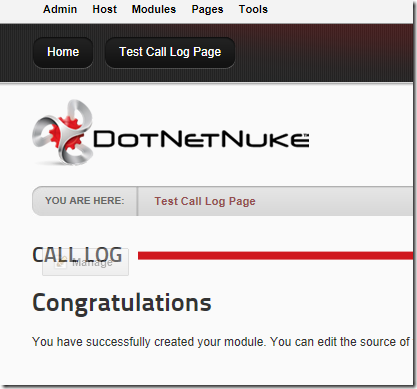
A page will be created and the module will show on the page.
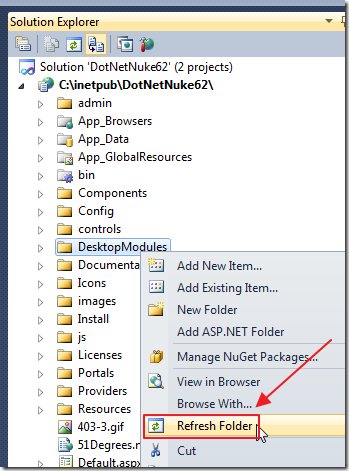
In Visual Studio, refresh the DesktopModules folder.
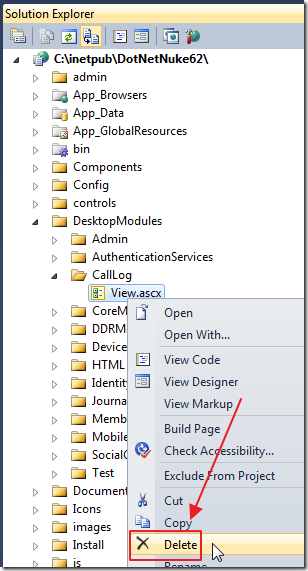
We need code behind for the View.ascx file, so delete the one created by the DotNetNuke wizard.
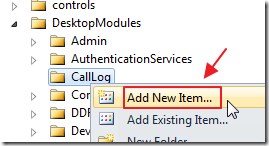
Add New Item to the CallLog folder.
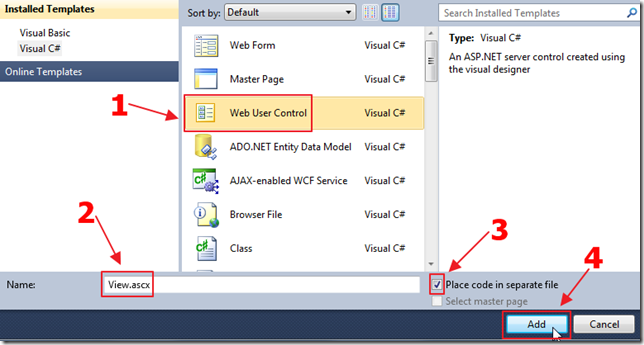
Add a new Web User Control called View.ascx.
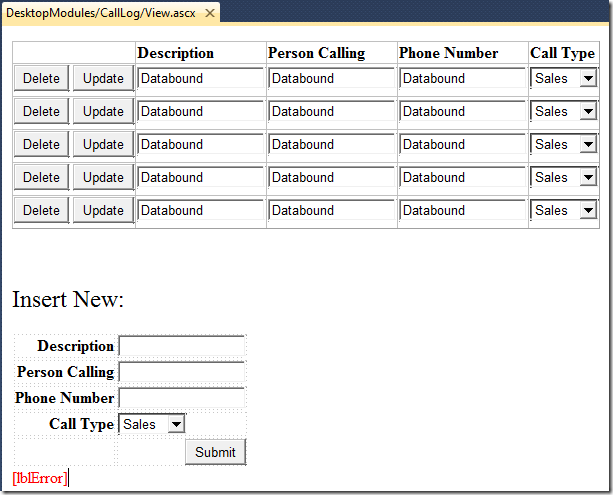
Paste the following code in the View.ascx file:
<%@ Control Language="C#" AutoEventWireup="true" CodeFile="View.ascx.cs" Inherits="DesktopModules_CallLog_View" %>
<style type="text/css">
.style1
{
font-weight: normal;
}
</style>
<asp:DataList ID="dlPhoneCalls" runat="server" GridLines="Both">
<HeaderTemplate>
</td><td>
<strong>Description</strong> </td>
<td>
<strong>Person Calling</strong>
</td>
<td>
<strong>Phone Number</strong>
</td>
<td>
<strong>Call Type</strong>
</HeaderTemplate>
<ItemTemplate>
<asp:Button ID="btnDelete" runat="server" Text="Delete"
CommandArgument='<%# Eval("Id") %>' onclick="btnDelete_Click" />
<asp:Button ID="btnUpdate" runat="server" onclick="btnUpdate_Click"
Text="Update" CommandArgument='<%# Eval("Id") %>'/>
</td><td>
<asp:TextBox ID="Description" runat="server" Text='<%# Eval("Description") %>' />
</td>
<td>
<asp:TextBox ID="PersonCalling" runat="server" Text='<%# Eval("PersonCalling") %>' />
</td>
<td>
<asp:TextBox ID="PhoneNumber" runat="server" Text='<%# Eval("PhoneNumber") %>' />
</td>
<td>
<asp:Label ID="lblCallType" runat="server" Text='<%# Eval("CallType") %>' Visible="False" />
<asp:DropDownList ID="ddlGridCallType" runat="server"
ondatabound="ddlCallType_DataBound">
<asp:ListItem>Sales</asp:ListItem>
<asp:ListItem>Service</asp:ListItem>
<asp:ListItem>Other</asp:ListItem>
</asp:DropDownList>
</ItemTemplate>
</asp:DataList>
<p>
</p>
<h2 class="style1">
Insert New:</h2>
<table>
<tr>
<td align="right">
<strong>Description</strong>
</td>
<td>
<asp:TextBox ID="txtDescription" runat="server"></asp:TextBox>
</td>
</tr>
<tr>
<td align="right">
<strong>Person Calling</strong>
</td>
<td>
<asp:TextBox ID="txtPersonCalling" runat="server"></asp:TextBox>
</td>
</tr>
<tr>
<td align="right">
<strong>Phone Number</strong>
</td>
<td>
<asp:TextBox ID="txtPhoneNumber" runat="server"></asp:TextBox>
</td>
</tr>
<tr>
<td align="right">
<strong>Call Type</strong>
</td>
<td>
<asp:DropDownList ID="ddlCallType" runat="server">
<asp:ListItem>Sales</asp:ListItem>
<asp:ListItem>Service</asp:ListItem>
<asp:ListItem>Other</asp:ListItem>
</asp:DropDownList>
</td>
</tr>
<tr>
<td align="right">
</td>
<td align="right">
<asp:Button ID="btnSubmit" runat="server" OnClick="btnSubmit_Click" Text="Submit" />
</td>
</tr>
</table>
<asp:Label ID="lblError" runat="server" EnableViewState="False" ForeColor="Red"></asp:Label>
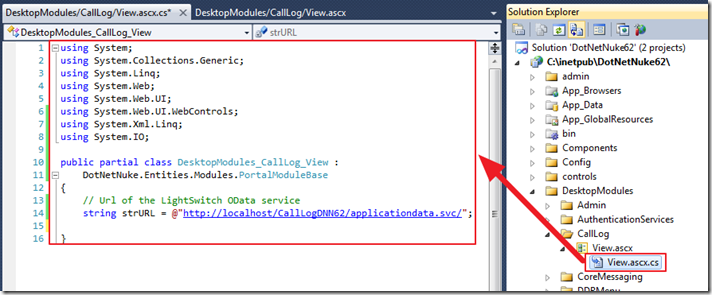
Paste the following code in the View.ascx.cs file:
using System;
using System.Collections.Generic;
using System.Linq;
using System.Web;
using System.Web.UI;
using System.Web.UI.WebControls;
using System.Xml.Linq;
using System.IO;
public partial class DesktopModules_CallLog_View :
    DotNetNuke.Entities.Modules.PortalModuleBase
{
    // Url of the LightSwitch OData service
    string strURL = @"http://localhost/CallLogDNN62/applicationdata.svc/";
    protected void Page_Load(object sender, EventArgs e)
    {
        if (!Page.IsPostBack)
        {
            // Must be logged in to make the OData call to LightSwitch
            // because LightSwitch has forms authentication enabled
            if (this.UserId > -1)
            {
                RefreshGrid();
            }
        }
    }
    // Utility
    #region ShowError(Exception ex)
    private void ShowError(Exception ex)
    {
        // see: http://msdn.microsoft.com/en-us/magazine/hh580732.aspx
        if (ex.InnerException != null)
        {
            // This is a complex error
            var sr = new StringReader(ex.InnerException.Message);
            using (sr)
            {
                XElement root = XElement.Load(sr);
                IEnumerable<XElement> message =
                    from el in root.Elements()
                    where el.Name.LocalName == "message"
                    select el;
                foreach (XElement el in message)
                {
                    // Check for validation error from LightSwitch
                    int intErrorStartPosition = el.Value.IndexOf(@"<ValidationResult>");
                    if (intErrorStartPosition > 0)
                    {
                        // Get the inner exception message
                        int intStartPosition = el.Value.IndexOf(@"<Message>", intErrorStartPosition);
                        int intEndPosition = el.Value.IndexOf(@"</Message>", intErrorStartPosition);
                        intStartPosition = intStartPosition + 9;
                        // Get the error
                        string ErrorMessage = el.Value.Substring(intStartPosition,
                            (intEndPosition - (intStartPosition)));
                        // Display tee error
                        lblError.Text = String.Format(@"{0}<br />", ErrorMessage);
                    }
                }
            }
            sr.Close();
        }
        else
        {
            // This is a simple error -- just show Message
            lblError.Text = String.Format(@"{0}", ex.Message);
        }
    }
    #endregion
}
Display Data
To display data use the following method:
    private void RefreshGrid()
    {
        // Create DataContext
        CallLogOData.wsCallLogOData.ApplicationData objApplicationData =
            new CallLogOData.wsCallLogOData.ApplicationData(new Uri(strURL));
        var result = from PhoneCalls in objApplicationData.PhoneCalls
                     select PhoneCalls;
        dlPhoneCalls.DataSource = result;
        dlPhoneCalls.DataBind();
    }
Also, to set the dropdown in each row to the proper value, use the following code:
    protected void ddlCallType_DataBound(object sender, EventArgs e)
    {
        // Get an instance of the DropDownList
        DropDownList objDropDownList = (DropDownList)sender;
        // Get the selected value from the hidden Label
        Label objLabel = (Label)objDropDownList.Parent.FindControl("lblCallType");
        // Set the selected value in the DropDownList
        objDropDownList.SelectedValue = objLabel.Text;
    }
Insert Data
To insert data, use the following code:
    protected void btnSubmit_Click(object sender, EventArgs e)
    {
        // Create DataContext
        CallLogOData.wsCallLogOData.ApplicationData objApplicationData =
            new CallLogOData.wsCallLogOData.ApplicationData(new Uri(strURL));
        try
        {
            // Create a new PhoneCall
            CallLogOData.wsCallLogOData.PhoneCall objPhoneCall =
                new CallLogOData.wsCallLogOData.PhoneCall();
            // Set values
            objPhoneCall.CallType = ddlCallType.SelectedValue;
            objPhoneCall.Description = txtDescription.Text;
            objPhoneCall.PersonCalling = txtPersonCalling.Text;
            objPhoneCall.PhoneNumber = txtPhoneNumber.Text;
            objPhoneCall.MessageTakenBy = UserInfo.Username;
            // Add new PhoneCall
            objApplicationData.AddToPhoneCalls(objPhoneCall);
            // Save changes
            objApplicationData.SaveChanges(
                System.Data.Services.Client.SaveChangesOptions.Batch);
            // Refresh the Grid
            RefreshGrid();
        }
        catch (Exception ex)
        {
            ShowError(ex);
            return;
        }
    }
Update Data
To update data, use the following code:
    protected void btnUpdate_Click(object sender, EventArgs e)
    {
        // Get an instance of the Button
        Button UpdateButton = (Button)sender;
        // Get the ID of the current record from the CommandArgument
        int intID = Convert.ToInt32(UpdateButton.CommandArgument);
        // Create DataContext
        CallLogOData.wsCallLogOData.ApplicationData objApplicationData =
            new CallLogOData.wsCallLogOData.ApplicationData(new Uri(strURL));
        try
        {
            // Get the record
            var result = (from PhoneCalls in objApplicationData.PhoneCalls
                          where PhoneCalls.Id == intID
                          select PhoneCalls).FirstOrDefault();
            if (result != null)
            {
                // Get the values
                TextBox Description =
                    (TextBox)UpdateButton.Parent.FindControl("Description");
                TextBox PersonCalling =
                    (TextBox)UpdateButton.Parent.FindControl("PersonCalling");
                TextBox PhoneNumber =
                    (TextBox)UpdateButton.Parent.FindControl("PhoneNumber");
                DropDownList ddlGridCallType =
                    (DropDownList)UpdateButton.Parent.FindControl("ddlGridCallType");
                // Update the record
                result.Description = Description.Text;
                result.PersonCalling = PersonCalling.Text;
                result.PhoneNumber = PhoneNumber.Text;
                result.CallType = ddlGridCallType.SelectedValue;
                objApplicationData.UpdateObject(result);
                // Save changes
                objApplicationData.SaveChanges(
                    System.Data.Services.Client.SaveChangesOptions.Batch);
                // Refresh the Grid
                RefreshGrid();
            }
        }
        catch (Exception ex)
        {
            ShowError(ex);
            return;
        }
    }
Delete Data
To delete data, use the following method:
    protected void btnDelete_Click(object sender, EventArgs e)
    {
        // Get an instance of the Button
        Button DeleteButton = (Button)sender;
        // Get the ID of the current record from the CommandArgument
        int intID = Convert.ToInt32(DeleteButton.CommandArgument);
        // Create DataContext
        CallLogOData.wsCallLogOData.ApplicationData objApplicationData =
            new CallLogOData.wsCallLogOData.ApplicationData(new Uri(strURL));
        try
        {
            // Get the record
            var result = (from PhoneCalls in objApplicationData.PhoneCalls
                          where PhoneCalls.Id == intID
                          select PhoneCalls).FirstOrDefault();
            if (result != null)
            {
                // Delete the record
                objApplicationData.DeleteObject(result);
                // Save changes
                objApplicationData.SaveChanges(
                    System.Data.Services.Client.SaveChangesOptions.Batch);
                // Refresh the Grid
                RefreshGrid();
            }
        }
        catch (Exception ex)
        {
            ShowError(ex);
            return;
        }
    }
Also See
DotNetNuke articles on LightSwitchHelpWebsite.com:
Easy DotNetNuke LightSwitch Deployment
Deploy Your LightSwitch Application As A DotNetNuke Module
Quick And Easy Data Management With LightSwitch
OData articles on LightSwitchHelpWebsite.com:
Shape Your LightSwitch OData Using WCF RIA Services
A Full CRUD LightSwitch JQuery Mobile Application
Calling LightSwitch 2011 OData Using Server Side Code
Using The OData Explorer with LightSwitch OData
Learn How To Make OData Calls In LightSwitch 2011
A LightSwitch Netflix OData Mash-up
Books
Download Code
The LightSwitch project is available at:
http://lightswitchhelpwebsite.com/Downloads.aspx
2 comment(s) so far...
Is this demo running on-line anywhere?
By tlanier on
8/22/2012 1:48 AM
|
@tlanier - Sorry no.
By Michael Washington on
8/22/2012 4:19 AM
|