May
12
Written by:
Michael Washington
5/12/2011 5:25 AM


Also see: Printing Sql Server Reports (.rdlc) With LightSwitch
With LightSwitch, there is no built in Printing. Here is a method that works. This will also show you how to create a custom template to allow you to print exactly what you want, not just the current screen.
Note: you need Visual Studio Professional (or higher) to create Custom Silverlight Controls.

Create a new LightSwitch application called PrintInvoice.

Select Create new table.

Create a table called Customer.

Select New Table.

Create a table called Loans.

Click the Relationship Button.

Select Customer in the Name/To dropdown and click OK.

Double-click on Customers in the Solution Explorer.

Add a MoneyOwed column to the Customer table.

In the Properties for the column, check the Is Computed box, and click the Edit Method link.

Enter the following code:
    result = (from loans in LoansCollection

                select loans).Sum(X => X.LoanAmount);
Save and close the Customer.cs file.

When you return to the table, you will see the computed property icon next to the MoneyOwed field

Click the Screen Button.

Create a List and Details Screen.
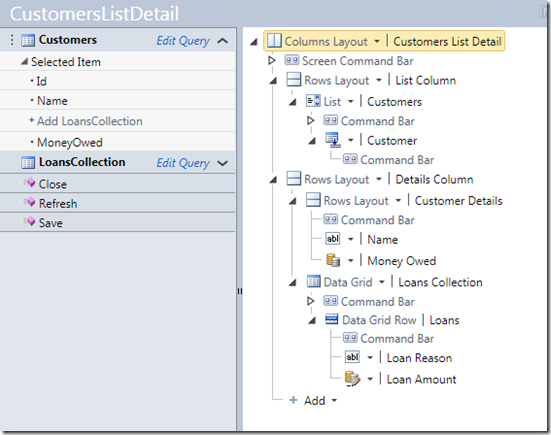
The Screen editor will show.

Hit F5 to build and run the application.

Enter some sample data.
Create The Custom Control

Select File, then Add, then New project…

Create a Silverlight Class Library.

Select Silverlight 4.

The Project will show in the Solution Explorer, right-click on the Class1.cs file and Delete it.

Right-click on the Custom Silverlight Controls Project and add New Item…

Create a Silverlight User Control called Invoice.xaml.

If you have Microsoft Expression Blend installed, you can right-click on the Invoice.xaml file and select Open in Expression Blend…

If you get the message above, click Close, it wont affect anything.

Go into Assets.

Grab a DataGrid.

Drop it on the design surface. This will add the needed references to support the DataGrid.

Switch to XAMl view .
Change the markup to the following:
<UserControl
xmlns:System="clr-namespace:System;assembly=mscorlib"
x:Class="CustomTemplate.Invoice"
mc:Ignorable="d"
d:DesignHeight="300" d:DesignWidth="400">
<StackPanel>
<Button Content="Print" Name="btnPrint" Click="btnPrint_Click" />
<Border BorderThickness="1" BorderBrush="#FF504F4F">
<Grid x:Name="LayoutRoot">
<Grid.ColumnDefinitions>
<ColumnDefinition Width="0.02*"/>
<ColumnDefinition Width="0.2*"/>
<ColumnDefinition Width="0.5*"/>
<ColumnDefinition Width="0.1*"/>
<ColumnDefinition Width="0.18*"/>
</Grid.ColumnDefinitions>
<Grid.RowDefinitions>
<RowDefinition Height="0.053*"/>
<RowDefinition Height="0.08*"/>
<RowDefinition Height="0.533*"/>
<RowDefinition Height="0.133*"/>
<RowDefinition Height="0.2*"/>
</Grid.RowDefinitions>
<sdk:DataGrid ItemsSource="{Binding Screen.LoansCollection, Mode=OneWay}"
AutoGenerateColumns="False" Grid.Row="2" Grid.Column="1" Grid.ColumnSpan="2" >
<sdk:DataGrid.Columns>
<sdk:DataGridTextColumn Binding="{Binding LoanReason}" CanUserSort="True" DisplayIndex="0"
Header="Loan Reason" MaxWidth="100" MinWidth="50" Visibility="Visible" Width="Auto"/>
<sdk:DataGridTextColumn Binding="{Binding LoanAmount, StringFormat=C}" CanUserSort="True" DisplayIndex="1"
Header="Loan Amount" MaxWidth="100" MinWidth="50" Visibility="Visible" Width="Auto"/>
</sdk:DataGrid.Columns>
</sdk:DataGrid>
<TextBlock TextWrapping="Wrap"
Text="Invoice For:" FontWeight="Bold" Grid.Row="1" VerticalAlignment="Top" HorizontalAlignment="Left"
Grid.Column="1" Margin="0,0,5,0"/>
<TextBlock TextWrapping="Wrap"
Text="{Binding Screen.Customers.SelectedItem.Name}" Grid.Row="1" Grid.Column="2" Margin="5,0,0,0"
HorizontalAlignment="Left" VerticalAlignment="Top"/>
<TextBlock TextWrapping="Wrap" Text="Date:" FontWeight="Bold" VerticalAlignment="Top"
Grid.Column="3" HorizontalAlignment="Left" Margin="4,0,0,0"/>
<TextBlock x:Name="InvoiceDate" Grid.Column="4" HorizontalAlignment="Left" VerticalAlignment="Top" />
<Rectangle Grid.ColumnSpan="2" Grid.Column="1" Fill="#FF010108" Height="8" Stroke="Black"
VerticalAlignment="Center"/>
<Rectangle Grid.Column="2" Fill="#FF010108" Height="8" Stroke="Black" VerticalAlignment="Bottom" Grid.Row="3"/>
<TextBlock TextWrapping="Wrap"
Text="Total:" FontWeight="Bold" Grid.Row="4" VerticalAlignment="Top" Grid.Column="1"
TextAlignment="Right" Margin="0,0,4,0"/>
<TextBlock Grid.Column="2" Height="16" Grid.Row="4" TextWrapping="Wrap"
Text="{Binding Screen.Customers.SelectedItem.MoneyOwed, StringFormat=C}"
VerticalAlignment="Top" Margin="4,0,0,0"/>
</Grid>
</Border>
</StackPanel>
</UserControl>
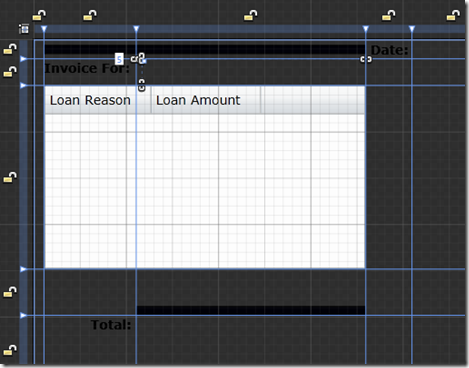
Change the code in the Invoice.cs file to the following:
using System;
using System.Windows.Controls;
using System.Windows.Printing;
namespace CustomTemplate
{
public partial class Invoice : UserControl
{
PrintDocument printInvoice = new PrintDocument();
public Invoice()
{
InitializeComponent();
InvoiceDate.Text = DateTime.Today.ToShortDateString();
}
private void btnPrint_Click(object sender, System.Windows.RoutedEventArgs e)
{
printInvoice.PrintPage +=
new EventHandler<PrintPageEventArgs>(printInvoice_PrintPage);
printInvoice.Print(String.Format("Invoice Date: {0}", DateTime.Today.ToShortDateString()));
}
void printInvoice_PrintPage(object sender, PrintPageEventArgs e)
{
e.PageVisual = LayoutRoot;
}
}
}
Save, and close the pages.
Return to Visual Studio and Build the project.
Note: see Creating A LightSwitch Custom Silverlight Control for more information on creating Silverlight Custom Controls.
Consume The Silverlight Custom Control
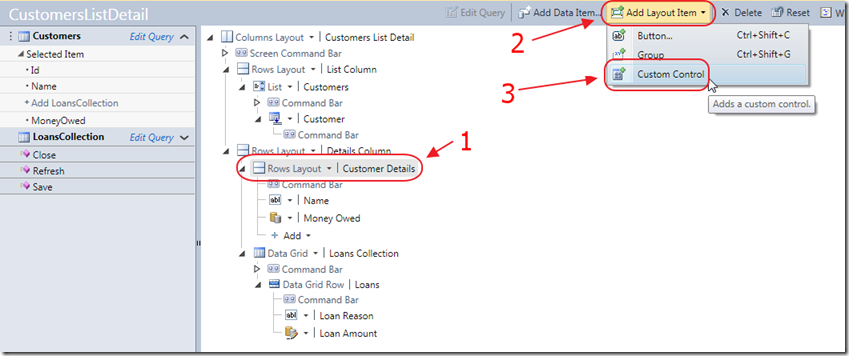
Return to the Screen editor in Visual Studio.
Select the DetailsColumn node, then select Add Layout Item, then select Custom Control.
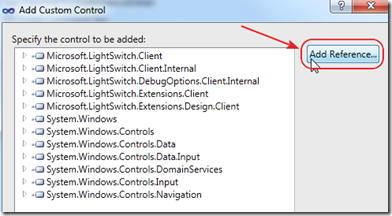
Click the Add Reference Button.
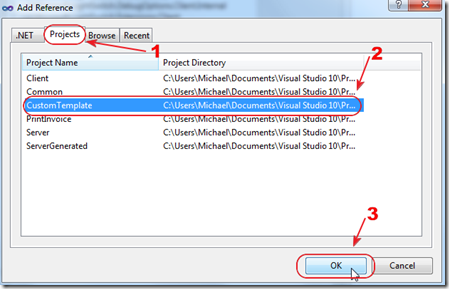
Create a Project reference to the CustomTemplate project.
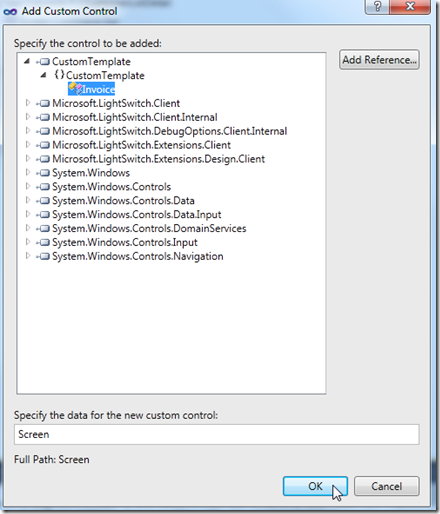
You will now be able to select the Invoice control you created.
Leave “Screen” in the “data” Text Box, and click OK.
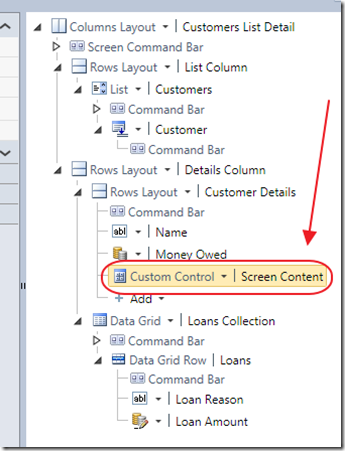
In the Screen editor, click in the Custom Control node.
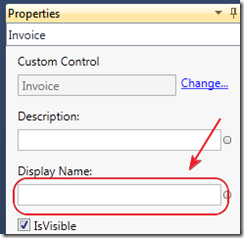
Clear the Display Name.
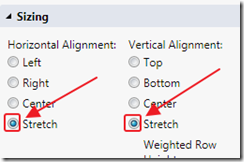
set the alignment to Stretch.
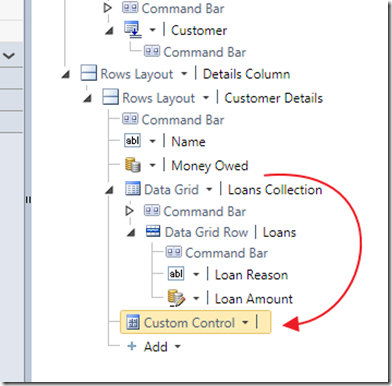
Drag the control under the Data Grid.
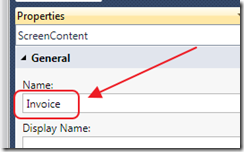
Change the name to Invoice.

Hit F5 to run the project.

When you run the project. You will see a Print button that will print the current Invoice.
Special Thanks
A special thanks to Sheel Shah for explaining how to get a programmatic reference to a Custom Control.
Also see: Microsoft Lightswitch Client Native Printing
Download
You can download the code on the Downloads page:
http://lightswitchhelpwebsite.com/Downloads.aspx
44 comment(s) so far...
Thanks for posting. This was very interesting.
By megafluffles on
8/24/2010 5:38 PM
|
Okay Michael, you are killing us here :) We're already sleepless from playing with custom controls and now you throw this at us. Maybe we should wait for the book? LOL
Keep 'em coming!
Cheers
By Paul on
8/25/2010 8:40 AM
|
@Paul - I hear you on the 'sleepless' part. You have to practically tear yourself away from the computer because LighSwitch is so much fun.
By Michael Washington on
8/25/2010 8:41 AM
|
Really great article.
I cannot make this work with vb.net though.
I cannot make the Button_Execute method a Partial Private Sub as I get the following error:
Method 'Button_Execute' cannot be declared 'Partial' because only one method 'Button_Execute' can be marked 'Partial'.
Any way around this?
By Andy James on
9/8/2010 10:25 AM
|
@Andy James - Sorry no experience with this using VB :(
By Michael Washington on
9/8/2010 10:26 AM
|
Thanks Michael, really appreciate the work you're doing with Lightswitch. I've bookmarked your blog.
By Pascal Mettey on
9/11/2010 5:58 AM
|
Hi There,I have an Image field in the database for the business' logo. I would like to insert the logo on to the invoice. How would I go about binding the image in the database on to an image control in the silverlight user control? Below is the code for my invoice. Thank You in Advance.
By Pieter van der Linde on
9/28/2010 4:15 AM
|
@Pieter van der Linde - I'm sorry but I do not have any example code, but I suspect that all you need to do is use a Silverlight image control. You will want to post a question on the LightSwitch forums.
By Michael Washington on
9/28/2010 4:18 AM
|
Andy, The problem is that you don't need to add partial keyword in VB. For C#, it is must. That's why always go from the designer to the code so you get the right stubs generated automatically for you.
By Prem on
10/8/2010 2:56 PM
|
One tiny addition: If you set the custom control to not visible (uncheck IsVisible in the properties pane) the UserControl won't display in the form, but will display when being printed. This hint is for all those mere mortals (tm) out there... I'm sure Michael's already figured this out.
Michael,
Excellent posts.
By tchichester@eps-software.com on
10/8/2010 2:56 PM
|
@tchichester - I did not know that. Thanks.
By Michael Washington on
10/8/2010 2:57 PM
|
Thanks for this walkthrough. The only problem I am having is that I cannot print grids that are longer than 1 page. It just prints one page and cuts everything off. Is there any way to print multiple pages using this method ? Thanks.
By Shane Ledford on
11/11/2010 12:44 PM
|
@Shane Ledford - You can try:
silverlightreport.codeplex.com/
or:
slreportlibrary.codeplex.com/
or:
silverlightreporting.codeplex.com/
By Michael Washington on
11/11/2010 12:50 PM
|
After looking at those sites and others literally all day I can't find a way to do multipage printing using a custom control and binding to screen data.
It seems like a very data reliant process, and no one is using data in the same way that I am with screen data.
I'm brand new to Silverlight, learning it as a need with Lightswitch, any help on multipage printing using this method would be greatly appreciated.
By Shane Ledford on
11/12/2010 2:21 PM
|
|
|
Thanks for posting this article, it helped me in making printable pages.
I want to know how do I change default currency symbol ($) based on local culture?
By Kundan on
11/22/2010 12:39 PM
|
@Kundan - Sorry I do not know off hand. However, this method uses a normal Silverlight control, so if you Bing/Google you can apply any solution you find for a normal Silverlight control.
By Michael Washington on
11/22/2010 12:40 PM
|
I have an Image field in the database for the business' logo. I would like to insert the logo on to the invoice. How would I go about binding the image in the database on to an image control in the silverlight user control? Below is the code for my invoice.
By Gross loan on
12/2/2010 5:12 AM
|
@Gross loan - I do not have any examples. You will want to go to social.msdn.microsoft.com/Forums/en-us/lightswitchgeneral/threads for help.
By Michael Washington on
12/2/2010 5:16 AM
|
I couldn't agree with you anymore. You read my mind fully.*_*
By chaussure basket on
12/5/2010 9:00 PM
|
i am new in programming I need to print the invoice but have not been tested with another report like codeplex
or something similar and vb
regards
By Maria on
3/14/2011 5:53 PM
|
This printing works fine if the App is intended for desktop deployment. But if you choose a Web Deployment that printing will not work and complain that only a user can invoke a dialog. Is there a way to print when the Lighswitch application is a Web Application?
By Craig on
7/26/2011 10:18 AM
|
@Craig - There is but I don't have any examples.
By Michael Washington on
7/27/2011 7:35 PM
|
I am also needing the ability to print from a web application. Any headway on this?
By Jason on
8/16/2011 2:32 PM
|
@Jason - Because there are so many commecial LightSwitch printing solutions, I do not know of anyone who is working on this, at least not me :)
By Michael Washington on
8/16/2011 2:34 PM
|
Hi
I have some experience in SQL and ASP.NET web forms, but I am new to Silverlight and obviously LightSwitch as well.
I have followed the entire tutorial, but did not succeeded at the very end. Main problems I had were related to custom control.
When you "Add Reference" in Add Custom Control window you write:
"Create a Project reference to the CustomTemplate project."
when I choose the appropriate CustomTemplate from within Projects tab and click "ok" I do not see it on top of the list. Actually I do not see any of the Microsoft.LightSwitch.... classes. My list starts from System.Windows
Does it mean I have not installed some extension. My LightSwitch application is installed on top of VS 2010 Pro version.
Also. I do not have Expression Blend installed on my machine. I just copied the .xaml code and replaced the original one while following tutorial. Can it influence onto the final result?
Cheers for help in advance
Bartosz
By Bartosz on
8/23/2011 4:29 AM
|
@Bartosz - Please download the attached code and see if it works for you. If you have further problems please post to the forums on this site.
By Michael Washington on
8/23/2011 4:30 AM
|
I pulled down the code for this example and I am getting an null expection printInvoice.Print(String.Format("{0}", this.Customers.SelectedItem.Name));
I am also getting the same error in my own program where I followed this example.
I am using VS2010 with Lightswtich installed.
Any ideas on how to resolve this would be fantastic.
Andrew
By Andrew_77 on
12/19/2011 7:46 AM
|
@Andrew_77 - You will get that error if a Customer is not selected first.
By Michael Washington on
12/19/2011 8:49 AM
|
I have selected a customer other than the default when the application opens (John). So, I click on Jane or Tim then click on Print Invoice and I get the error. I clicked into the Name field and get the error, I select one of the records in the grid and get the error. I have selected everything possible in this screen and no luck.
Thanks - Andrew
By Andrew_77 on
12/20/2011 5:45 AM
|
While in debugger, I followed the object chain and there is a valid selected item of Jane, Tim, or John depending on which Customer I selected. I am using Windows 7, Visual Studio 2010 w/ LightSwtich Installed. I am wondering if there isn't something going on with the PrintDocument object and something not being set and this is throwing the null exepction error.
By Andrew_77 on
12/20/2011 6:26 AM
|
@Andrew_77 - I suspect Silverlight 5 may have changed some things. I will update this article next week with new code.
By Michael Washington on
12/20/2011 6:44 AM
|
The code has been updated.
By Michael Washington on
12/21/2011 6:39 AM
|
Great article Michael
Have you tried setting the page to legal and the orientation to landscape, then print the report ?
Seems like the page setting are not passed to the print driver forcing the user to select the page type and orientation every time that a report is run, I'm told that this is a SL problem.
Have you experienced this and if so how did you work around it ?
By TerryH on
1/5/2012 10:19 AM
|
@TerryH - I have not heard of that problem before now... so, sorry I have no answer :(
By Michael Washington on
1/5/2012 10:37 AM
|
@Bartosz - did you find a solution to your problem? as I am having the same issue
By Martin Arr on
1/6/2012 6:00 AM
|
i think this is a good resouce, thanks for the info on printing with lightswitch, very useful to me and my staff.
By printing on
1/8/2012 10:37 AM
|
Hi Michael
Excellent!
This gives me valuable advice on how I can print from a light switch application.
Even though I still do not understand everything right now, thank you very much!
By Urs Gloor on
1/20/2012 3:23 AM
|
Thanks for this walkthrough, what if i want to send the documant directly to the defulat printer without selecting the printer from the print dialog box.
Best Regards
By Abu Shabab on
2/28/2012 7:32 AM
|
Hi Michael,
Great post, thank you.
Do you know how to set a page margin for this? The above Silverlight print control seems to print right to the edge of the page.
By Daniel on
5/8/2012 7:05 PM
|
Thanks for your help
I tried this code and used to work fine but now when i try to print the application show un exception about security
and user should open dialog by himself !!
any sol.
best regards
By Naser on
10/26/2012 10:26 AM
|
@Naser - That is probably a popup blocker on the web browser. I know of no way to get past pop up blockers.
By Michael Washington on
10/26/2012 10:27 AM
|
Hi Michael,
I have a problem, when trying to Add the reference i can select the check box but the reference won't show up in the following screen. I suspect it could be caused by an extension or so.
Do you have any idea of what is going on?
By James Restrepo on
10/29/2013 12:23 PM
|
@James Restrepo - This tutorial is old. Things probably changed with Silverlight 5.
By Michael Washington on
10/29/2013 12:23 PM
|