May
13
Written by:
Michael Washington
5/13/2011 9:46 PM

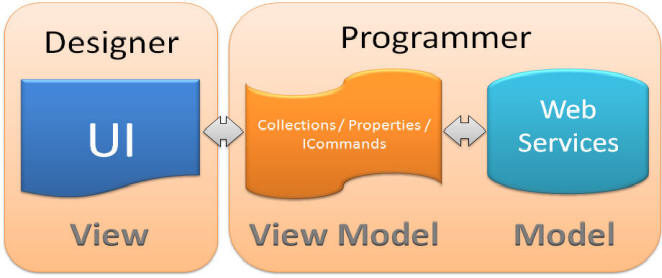
This article, Silverlight View Model Style: An (Overly) Simplified Explanation, explains what MVVM is. Basically:
- Model – The Data
- View Model – Collections, Properties, and Commands
- View – The UI (User Interface)
This article, covers some of the problems in implementing MVVM, mostly that is is verbose, time-consuming, and difficult for many developers to understand and implement. That is not to say that MVVM is not a superior pattern once you have mastered it, but using a tool such as LightSwitch greatly eases it’s use.

This article, Simple Silverlight Configurator/Pivot (View Model/MVVM) , demonstrates a simple MVVM application that displays a Silverlight Pivot Viewer.

The article shows the View Model (on the right side of the image above), and how it is bound to the View.
LightSwitch IS A MVVM “Tooling” Framework
There are many MVVM Frameworks out there to assist in creating MVVM code. However, LightSwitch is different, because it is a ”MVVM Tooling Framework”. Do not discount the importance of a tool when using a Framework. Building houses has established patterns and frameworks, but try getting that nail into the wood without a hammer  .
.
With LightSwitch, you can use Silverlight Custom Controls for the View… that’s it. Everything else, The Model and the View Model, are created inside the Visual Studio LightSwitch “tool”. You do not want to fight this.

With LightSwitch, you create the View Model, by placing Properties, Collections, and Commands (Methods are used in LightSwitch, as far as the “pattern” is concerned, they are the same thing because they serve the same purpose, to invoke a method in the View Model) , on the left-hand side of the Screen designer. You then bind UI elements, (either the the build-in LightSwitch controls, control extensions, or Silverlight Custom Controls), to those Properties, Collections, and Commands.

LightSwitch easily guides you through creating the View Model. When you click the button to Add Data Item…

Your only choice is to add a Property, Collection, or Command (in LightSwitch, a Command is a Method).
The LightSwitch Pivot Sample

Let’s walk through the steps required to implement the Silverlight Pivot application inside LightSwitch (we will not have the animations of the original project because they use Behaviors and you cannot use Behaviors with LightSwitch).
The Model

The Model is the data. In LightSwitch you create the Model by simply creating tables.
However, in this example, we have a situation where we will have a “Gender” dropdown that needs to run a different query if the user selects “M” or “F”, or the user selects “All”.
That means a simple query, or “filter”, will not work. We need “if… then” logic in our query. When you are faced with this situation, you need to use a PreProcessQuery. to use a PreProcessQuery, you create a query on your table.

We right-click on the People table we just created and select Add Query.

We add a parameter called Gender, and select PreProcessQuery from the Write Code dropdown.
We write the following code:
    partial void PivotQuery_PreprocessQuery(string Gender, ref IQueryable<Person> query)
    {
        // If Gender is not All then filter it
        if (Gender != "All")
        {
            query = query.Where(x => x.Gender == Gender);
        }
    }
That’s it. Our Model is complete. We will use this query as the data for our View Model rather than just the People table.
Note that LightSwitch is very powerful. We can create a query that is based on another query and so on.
The View Model

We create a Screen and add the properties using the Add Data Item… button.

We also add the PivotQuery we created earlier that has the PreProcessQuery code.

We edit the query so it resembles the image above. Notice that Gender is greyed out. This shows that this parameter can only be edited by opening the underlying query, yet it is a parameter that will need to be mapped in the next step.

We return to the screen designer and map all the parameters to properties.

To set the default values for some of the parameters, we select Write Code, then the InitializeDataWorkspace method.
We enter the following code:
    partial void PivotViewer_InitializeDataWorkspace(List<IDataService> saveChangesTo)
    {
        // Set Defaults
        this.WeightHigh = 250;
        this.AgeHigh = 60;
        this.Gender = "All";
    }
This is the process of creating a View Model in LightSwitch.
The View

We need a dropdown for Gender, so we click on Gender on the left-hand side of the Screen, and then in Properties, we click Choice List and enter the choices.

When we add Gender to the object tree on the right-hand side of the Screen, it automatically shows as a dropdown control.

We take the XAML for the people display from the original project, removing the sliders, and putting them in separate Silverlight Custom Controls. We change the binding to start with “Screen”, referring to the LightSwitch View Model, followed by the Property, Collection, or Method (Command) we want to bind to (in this case PivotQuery).
We lay out the object tree on the right-hand side of the screen and add the Silverlight Custom Controls. See the article at this link for the steps on adding a Silverlight Custom Control to the object tree.

We complete the remaining bindings. The image above shows what is bound to what.
Also see:
Two Ways To Call LightSwitch From a Custom Silverlight Control
Download
You can download the code at this link.
9 comment(s) so far...
Nice Share.
By Kunal Chowdhury on
5/14/2011 5:02 AM
|
@Kunal Chowdhury - Thank You!
By Michael Washington on
5/14/2011 5:02 AM
|
Awesome :)
By Basarat on
5/15/2011 7:22 PM
|
@Basarat - Thank you for the support :)
By Michael Washington on
5/15/2011 7:22 PM
|
Mike, thank you for your excellent efforts to lift off LightSwitch into orbit :)
I love the visual aids you use to help visual learners like myself.
You are a guiding light!
Ali Adams
God >
By Ali Adams on
10/27/2011 9:02 AM
|
@Ali Adams - Thank You!
By Michael Washington on
10/27/2011 9:02 AM
|
So, so great visual article...
By YJ on
1/25/2012 5:19 AM
|
@YJ - Thank you for the feedback :)
By Michael Washington on
1/25/2012 5:20 AM
|
Excellent article keep up the good work. Very Informative I could not think Lightswitch could do that.
By Riaz Gulamali on
8/2/2012 7:56 AM
|