Aug
14
Written by:
Michael Washington
8/14/2011 6:37 AM


If you are not a Silverlight programmer, LightSwitch is still easy to use. You just need to use LightSwitch Control Extensions. It is important to note the difference between a Silverlight Custom Control, and a LightSwitch Control Extension.
Karol Zadora-Przylecki covers the difference in the article “Using Custom Controls to Enhance Your LightSwitch Application UI” (http://blogs.msdn.com/b/lightswitch/archive/2011/01/13/using-custom-controls-to-enhance-lightswitch-application-ui-part-1.aspx).
Essentially the difference is that a LightSwitch Control Extension is installed into LightSwitch, and meant to be re-used in multiple LightSwitch applications, like a normal internal LightSwitch control. The downside is, that creating a LightSwitch Control Extension, is significantly more difficult and time-consuming to create.
Silverlight Custom Controls are controls created specifically for the LightSwitch application they will be implemented in. They are significantly easier to create.
Control Extensions are harder to create, but they are significantly easer to use. Keep in mind that for full control over the look of the user interface, you will want to use a Silverlight Custom Control because one disadvantage of Control Extensions, is that you can only change options that are available in the property options panel for the control (see: The LightSwitch Control Extension Makers Dilemma) (also note, in this example, we will not implement any property panel options for the sample control).

Note that there are 5 types of Control Extensions you can create. This article will only demonstrate the simplest, the Value Control Extension.

For a detailed explanation of the process to create a Value Control Extension, see the article: Walkthrough: Creating a Value Control Extension.
The Process to Use A Custom Control Extension

Let us first look at the process to use a completed LightSwitch Custom Control Extension.
When we create a Custom Control Extension, we have a solution that contains several projects.

We go into the Configuration Manager of the .Vsix project…

We set the Active Configuration to Release, and we Build the Solution.
 '
'
When we look in the ..\ReynaertIPhoneToggle.Vsix\bin\Release folder, we see a .vsix file that we can open…

This allows us to install the extension.
Note: that it installs the extension to a sub folder in the folder %LocalAppData%\Microsoft\VisualStudio\10.0\Extensions\ . The process to uninstall an extension is to simply delete the folder the extension is installed in.

When we go into Properties in our LightSwitch application…

… we can enable the extension by checking the box next to it on the Extensions tab.

This allows us to select the control for any field that it supports on the Screen designer.

The control shows up when the application is run.
Tools You Need To Create Control Extensions

The first step is to install the LightSwitch Extensibility Toolkit. You will need to make sure you also have the prerequisites. You can get everything at this link: http://msdn.microsoft.com/en-us/library/ee256689.aspx
The Sample Project

For the sample project, we will start with the application created in It Is Easy To Display Counts And Percentages In LightSwitch. This application allows users to take phone messages.

This application only contains one Entity (table) called PhoneCalls. We open the Entity and add two Boolean fields, Urgent and Completed.

We then add the two fields in the Screen designer.

When we run the application, the added fields show up as check boxes.
Check boxes are actually not the best user experience. They are small, so the user has to carefully position their mouse on the box and carefully click it to change it’s value.
What we desire is a much larger control that leaves a lot of room for error when trying to change it’s value.
Create The LightSwitch Control Extension

Let’s use a Silverlight control that looks good. Alexander Reynaert has created a Silverlight control that resembles a IPhone toggle. You can get the original project here:
http://reynaerta.wordpress.com/2010/12/26/iphone-like-switch-button-in-silverlight/.

Open Visual Studio and select File then New Project.

Let’s call the project ReynaertIPhoneToggle.

A number of Projects will be created.
Right-click on the ReynaertIPhoneToggle.Lspkg project and select Add then New Item.

Select Control and name it IPhoneToggle.xaml.

The screen will resemble the image above.

Open the Alexander Reynaert SwitchButton project, and drag and drop the Themes folder (and the Generic.xaml file), and the SwitchButton.cs file, and drop them in the ReynaertIPhoneToggle.Client project.

Open the SwitchButton.cs file and change the namespace to ReynaertIPhoneToggle.Presentation.Controls.
Save the file.

Change the code for the IPhoneToggle.xaml to the following:
<UserControl x:Class="ReynaertIPhoneToggle.Presentation.Controls.IPhoneToggle"
    xmlns="http://schemas.microsoft.com/winfx/2006/xaml/presentation"
    xmlns:x="http://schemas.microsoft.com/winfx/2006/xaml"
    xmlns:my="clr-namespace:ReynaertIPhoneToggle.Presentation.Controls">
    <my:SwitchButton IsChecked="{Binding Value, Mode=TwoWay}" Height="40" Width="140"/>
</UserControl>
What this does is implement the SwitchButton control. It also sets the binding to Value and this is what LightSwitch will bind to (and sets it to TwoWay so it can be updated by LightSwitch, and will also update the value stored in LightSwitch). The various forms of binding are covered in Creating Visual Studio LightSwitch Custom Controls (Beginner to Intermediate).

Open the Themes/Generic.xaml file in the ReynaertIPhoneToggle.Client project, and change the “xmlns:local=” line to: "clr-namespace:ReynaertIPhoneToggle.Presentation.Controls".
This is done so that the Generic file that contains the layout for the control is in the same namespace as the control.
Save the file.

To set the data type that this control will bind to, right-click on the IPhoneToggle.lsml file in the ReynaertIphoneToggle project and select Open.
Set the type as Boolean.

There are IPhoneToggle.png icons that you will want to customize with 16x16 images. These display in various menus when the control is implemented.
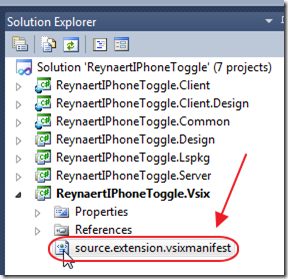
In the Solution Explorer, double-click on the source.extension.vsixmanifest file to open it.

This page allows you to set properties for the control. For more information see: How to: Set VSIX Package Properties and How to: Distribute a LightSwitch Extension.
Test Your Control Extension
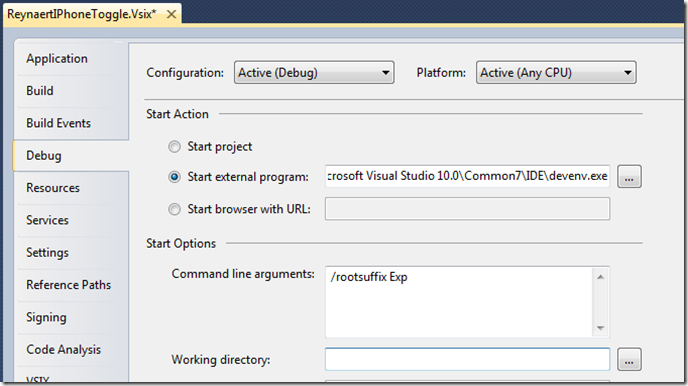
Note: All these values may already be set correctly:
-
In the Solution Explorer, select the ReynaertIPhoneToggle.Vsix project.
-
On the menu bar, choose Project, ReynaertIPhoneToggle.Vsix Properties.
-
On the Debug tab, under Start Action, choose Start external program.
-
Enter the path of the Visual Studio executable, devenv.exe.
By default on a 32-bit system, the path is C:\Program Files\Microsoft Visual Studio 10.0\Common7\IDE\devenv.exe; on a 64-bit system, it is C:\Program Files (x86)\Microsoft Visual Studio 10.0\Common7\IDE\devenv.exe.
-
In the Command line arguments field, type /rootsuffix Exp as the command-line argument.
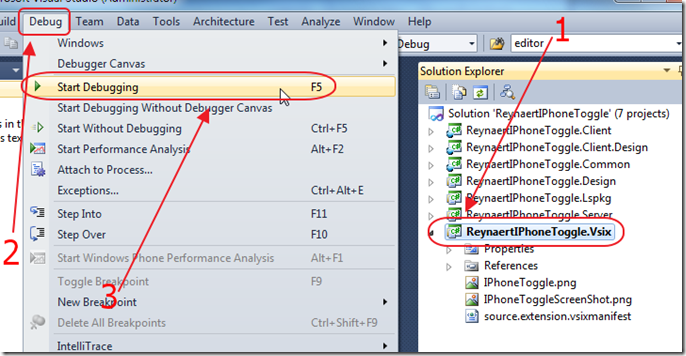
Ensure that the ReynaertIPhoneToggle.Vsix project is selected in the Solution Explorer, then select Debug, then Start Debugging.
This will open another instance of Visual Studio.

Open a new Project and open the CallLog Project.
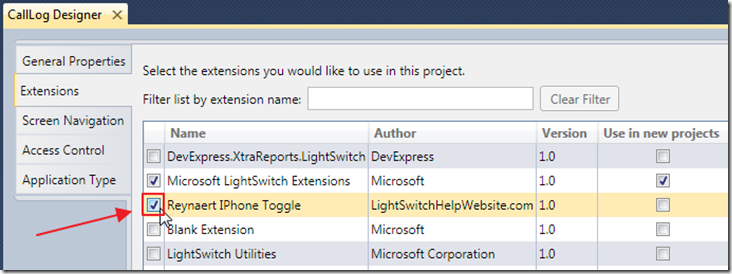
In the Solution Explorer in Visual Studio, double-click on Properties to open properties. Then, select the Extensions tab and check the box next to Reynaert IPhone Toggle.
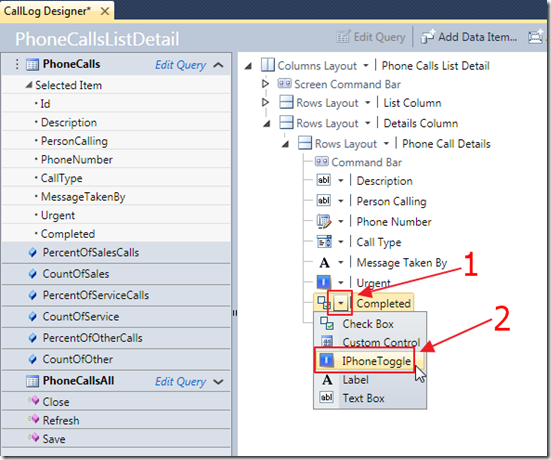
In the Screen designer, change the Completed and Urgent check boxes to to use the IPhoneToggle control.
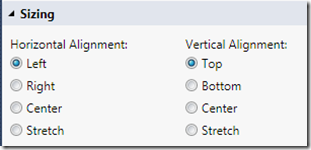
In the Properties for each control, set the Alignment according to the image above.
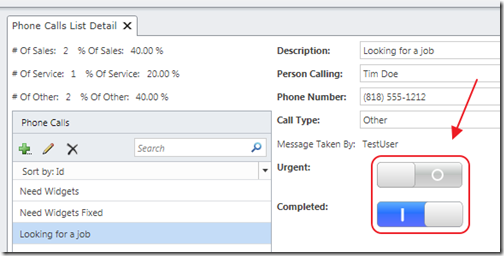
When you run the application, the toggle controls will display instead of the check boxes. Clicking on them will change their state.
Yes You Can Now Sell Your Control!
Now you have a LightSwitch control that you can easily sell.
Take a look at “My Offer To You” in this article: The Visual Studio LightSwitch Economy.
Download Code
The LightSwitch project is available at http://lightswitchhelpwebsite.com/Downloads.aspx
Also See:
Microsoft Tutorials:
6 comment(s) so far...
Excellent article.
Maybe interesting for other readers, to update in the text:
"To set the data type that this control will bind to, right-click on the Module.lsml file in the ReynaertIphoneToggle"
should be
To set the data type that this control will bind to, right-click on the *** ReynaertIPhoneToggle.lsmlfile **** in the ReynaertIphoneToggle.Common Project.
Take care
-paul.
By paul van bladel on
8/15/2011 7:42 AM
|
@paul van bladel - Ok it's fixed. Thanks for that!
By Michael Washington on
8/15/2011 8:24 AM
|
Thanks Michael.
I'm back to LS after some drags into web dev. Purchased ur book on the first day, but haven't even opened it. Will try to follow ur advise and see if i can contribute more to LS community.
Kudos! :) :)
By Bala on
8/25/2011 12:28 PM
|
Thanks for another great article Michael.
I downloaded the code and tried to open it, but got an error...
The project file '...\ReynaertIPhoneToggle\ReynaertIPhoneToggle.Lspkg\ReynaertIPhoneToggle.Lspkg.csproj' cannot be opened.
The project type is not supported by this installation.
I am using VS2010 Professional SP1 and the full version of Lightswitch. Any idea why I can't load the project?
Thanks
By Yossu on
9/19/2011 5:34 AM
|
@Yossu - Darn I am at a loss! The requirements to create extensions are listed here: http://msdn.microsoft.com/en-us/library/ee256689.aspx
By Michael Washington on
9/19/2011 5:46 AM
|
Duh, I downloaded the Visual Studio LightSwitch 2011 Extensibility Toolkit and forgot to install it!
Works fine now :)
Thanks
By Yossu on
9/19/2011 9:04 AM
|