Dec
22
Written by:
Michael Washington
12/22/2011 9:41 PM


Note: The author has received compensation from ComponentOne for the following article:
The ComponentOne FlexGrid control from the Studio for Silverlight suite allows Visual Studio LightSwitch developers the freedom to implement complex solutions required of professional Line-Of-Business applications. This article will explore and demonstrate a small subset of the most common features of the C1FlexGrid control.
What will be covered:
- Creating a simple Expense Report application
- Implementing security
- Implementing computed/calculated fields
- Implementing Silverlight Custom Controls in LightSwitch
- ComponentOne FlexGrid Control
- Binding
- Grouping
- Filtering
- Data Templates
- Colum formatting
- Printing
LightSwitch has a built-in data grid control, but it does not have grouping, client-side filtering, or printing.
To complete the application described in this article, the following is required:
- ComponentOne Studio for Silverlight suite
- Visual Studio 2010 Professional (or higher)
- Visual Studio LightSwitch 2010 (or higher)
The Expense Report Application

To demonstrate the C1Flexgrid control, we will create a sample Expense Report application.


The application uses only two Entities (tables):
- ExpenseReport – Contains one record for each expense report.
- ReportDetail – Contains one record for each expense item associated with each expense report.
Security
Each user (employee) will have the ability to create and edit his or her own expense reports. Only an administrator will be able to see all expense reports. This requires that security is enabled in the LightSwitch application.

In the Properties of the application, Forms authentication is enabled.
To restrict the ability to view and edit expense reports, we must save the user name of the current user in the ExpenseReport record (the ReportDetail records will automatically be restricted because they can only be retrieved by first gaining access to the parent ExpenseReport record).

We implement this by opening the ExpenseReport entity and selecting the ExpenseReport_Created method in the Write Code menu.
We use the following code to set the values in the record to the current user:
        partial void ExpenseReport_Created()
        {
            // When the ExpenseReport record is created
            // Set the UserName and Employee fields
            // UserName is used for PreProcess query filtering
            // Employee is used to display the Employee's full name
            this.UserName = Application.User.Name;
            this.Employee = Application.User.FullName;
        }

To restrict an employee’s access to only his or her expense reports, we implement the ExpenseReports_All_PreprocessQuery method.
The following code is all that is required to implement this feature yet still allow an Administrator the ability to view and edit all expense reports:
        partial void ExpenseReports_All_PreprocessQuery(ref IQueryable<ExpenseReport> query)
        {
            // This will run if the user is not an Administrator
            bool IsAdmin = this.Application.User.HasPermission(Permissions.SecurityAdministration);
            if (!IsAdmin)
            {
                // This will restrict this query to the current Employee
                query = query.Where(x => x.UserName == this.Application.User.Name);
            }
        }

When the application is Published and running, we can create a Role, assign SecurityAdministration Permission to the Role, and then assign Users to the Role.

Also, the Users Administration allows us to set the Full Name of each user.

Note: When debugging the application, we can enable and disable the Security Administration permission for the Test debug user in the project properties screen.
While it is possible to implement custom code to filter records using the C1FlexGrid control, it is important that you leverage the built-in features of LightSwitch whenever it is appropriate, especially when dealing with security.
This also applies to calculated fields.
Calculated Fields

The following code is used to provide a report total for all the associated ReportDetail records:
        partial void ReportTotal_Compute(ref decimal? result)
        {
            decimal dReportTotal = 0.0M;
            // Get ReportDetails for the Report
            var colReportDetails = from ReportDetails in this.ReportDetails
                                   select ReportDetails;
            foreach (var report in colReportDetails)
            {
                dReportTotal = dReportTotal + report.ExpenseAmount;
            }
            result = dReportTotal;
        }
This example demonstrates how information from associated entities can be surfaced into a single entity. The C1FlexGrid control can only be bound to a single collection at a time (this is also true of the built-in LightSwitch data grid).
The following code is used on the ExpenseRequestedAmount_Changed property (on the ReportDetails entity), to implement the business rule that any expense amount over $300.00 is reimbursed at only 50% for the amount over $300.00:
        partial void ExpenseRequestedAmount_Changed()
        {
            // Set Amount
            ExpenseAmount = ExpenseRequestedAmount;
            // Set Adjustment -- if any
            ExpenseAdjustmentReason = null;
            if (ExpenseRequestedAmount > 300)
            {
                var dNewAmount = (ExpenseRequestedAmount -
                    ((ExpenseRequestedAmount - 300) / 2));
                // Rounding code to prevent Decimal from having too many trailing digits
                ExpenseAmount =
                    Convert.ToDecimal(Math.Round(dNewAmount, 2));
                // Set the Adjustment Reason
                ExpenseAdjustmentReason = "50% of amount over $300";
            }
        }

We create a List and Details screen.

We now have a LightSwitch-only version of the application.
The Pros and Cons of the LightSwitch-Only Version
At this point, we have created a functioning expense report application using only built-in LightSwitch controls.
Here are the pros and cons of the current solution:
- Pros
- The application is easy to create.
- Cons
- The data grid does not allow custom formatting.
- The data grid does not group Expense Reports by Employee.
- The data grid does not allow complex client-side filtering
- The current design only allows one Expense Report to be opened at a time (it does not leverage the multiple tabs in LightSwitch).
- The data grid cannot be printed.
The FlexGrid Version of the Expense Report Application
The FlexGrid version of the expense report application will be demonstrated using two screens. Each screen will use the C1FlexGrid control in a different way.
- Expense Report Dashboard – Displays the expense reports using grouping and sorting. Demonstrates client-side filtering, and allows an expense report to be selected and opened up in a separate tab using the ExpenseReportDetail screen.
- Expense Report Detail – Contains a single expense report and all the report details associated with the expense report. Adding, editing, deleting records, and printing is demonstrated.
Expense Report Dashboard

First we create a new screen called ExpenseReportDashboard. We do not set the Screen Data because we will need to create the screen from scratch.

When the screen opens, we click the Add Data Item button.

We add the ExpenseReports collection to the screen.
Creating The Silverlight Control

We now need to add the Silverlight control that will host the C1FlexGrid control.
To add a Silverlight project to host the Silverlight control, we click File, Add, New Project.

We add a Silverlight Class Library to the solution.

We select Silverlight 4 and click OK.

We add a Silverlight User Control and name it ExpenseReports.xaml.
We also add references to the Common project and the following assemblies:
- C1.Silverlight.FlexGrid.4
- C1.Silverlight.FlexGridFilter.4
- Microsoft.LightSwitch
- Microsoft.LightSwitch.Base.Client
- Microsoft.LightSwitch.Client
Note: You must install the ComponentOne Studio for Silverlight suite for the ComponentOne assemblies to be available.
Note: On a 32 bit operating system, the LightSwitch assemblies can be found at: ..\Program Files\Microsoft Visual Studio 10.0\Common7\IDE\LightSwitch\1.0\Client\
Note: On a 64 bit operating system, the LightSwitch assemblies can be found at: ..\Program Files (x86)\Microsoft Visual Studio 10.0\Common7\IDE\LightSwitch\1.0\Client\
We use the following code for ExpenseReports.xaml:
<UserControl x:Class="SilverlightClass.ExpenseReports"
    xmlns="http://schemas.microsoft.com/winfx/2006/xaml/presentation"
    xmlns:x="http://schemas.microsoft.com/winfx/2006/xaml"
    xmlns:d="http://schemas.microsoft.com/expression/blend/2008"
    xmlns:mc="http://schemas.openxmlformats.org/markup-compatibility/2006"
    xmlns:c1="http://schemas.componentone.com/winfx/2006/xaml"
    xmlns:sdk="http://schemas.microsoft.com/winfx/2006/xaml/presentation/sdk"
    xmlns:my="clr-namespace:System;assembly=mscorlib"
    mc:Ignorable="d"
    d:DesignHeight="300" d:DesignWidth="400">
    <Grid x:Name="LayoutRoot">
        <c1:C1FlexGrid  ItemsSource="{Binding Screen.ExpenseReports}"
                       Name="c1FlexGrid1"
                       AreRowGroupHeadersFrozen="False"
                        HeadersVisibility="Column"
                        GridLinesVisibility="Horizontal"
                        Background="White"
                        RowBackground="White"
                        AlternatingRowBackground="White"
                        GroupRowBackground="White"
                        SelectionBackground="#a0eaeff4"
                        CursorBackground="#ffeaeff4"
                        AutoGenerateColumns="False"
                        HorizontalContentAlignment="Stretch" AllowMerging="Cells">
            <c1:C1FlexGrid.Columns>
                <c1:Column Binding="{Binding ReportDate, StringFormat=\{0:d\}}"
                           ColumnName="ReportDate" Width="120" AllowResizing="False" Header="Report Date" IsReadOnly="True" />
                <c1:Column Binding="{Binding ReportName}"
                           ColumnName="ReportName" Width="220" AllowDragging="False" AllowResizing="False" Header="Report Name" IsReadOnly="True" />
                <c1:Column Binding="{Binding ReportTotal, StringFormat=\{0:c\}}"
                           ColumnName="ReportTotal" Header="Total" AllowDragging="False" AllowResizing="False" IsReadOnly="True" />
            </c1:C1FlexGrid.Columns>
        </c1:C1FlexGrid>
    </Grid>
</UserControl>

Important: Build the Silverlight project at this point.

We return to the ExpenseReportDashboard screen in LightSwitch, and add a New Custom Control.

When the Add Custom Control dialog appears, we select Add Reference.

We click the .NET tab and add references to the following assemblies:
- C1.Silverlight.FlexGrid.4
- C1.Silverlight.FlexGridFilter.4
We then select the Projects tab and also select the SilverlightClass project.
We then click OK.

This will now allow us to select the ExpenseReports control.
We leave Screen in the data box, because we programmed the binding in the control to use the data coming from Screen.
We click OK.

Use the following settings for the Custom Control:
Name: SilverlightControl
Label Position: None
Alignment: Stretch

When we press F5 to run the application, we see the C1FlexGrid control.

Sorting is automatically enabled.
Note: When we later implement client-side filtering, we will need to click on the center of the column to sort.

The diagram above shows how the ExpenseReports collection is consumed in the XAML code in the ExpenseReports.xaml file.
Client-Side Filtering

To enable client-side filtering on the FlexGrid, we simply add the FlexGridFilter declaration to the ExpenseReports.xaml file.
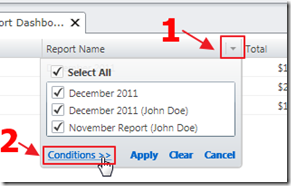
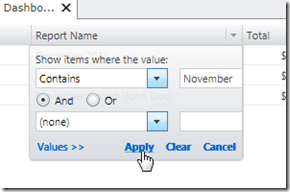

This allows the end-user to easily apply filtering to the C1FlexGrid control.
Grouping
Implementing grouping in the C1FlexGrid control is a bit more complicated because it requires code rather than only XAML mark-up.
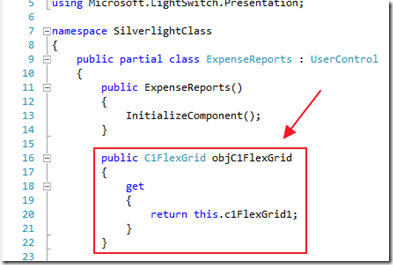
The first step is to add a public property to the ExpenseReports.xaml.cs file that will expose the C1FlexGrid control, and enable programmatic access in the LightSwitch project.
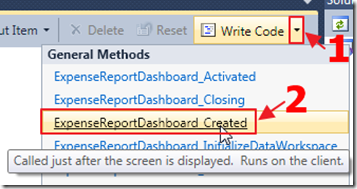
We return to the ExpenseReportDashboard screen in the LightSwitch project and implement the ExpenseReportDashboard_Created method.
We use the following code to wire-up an event handler to call the c1FlexGridProxy_ControlAvailable method:
    public partial class ExpenseReportDashboard : IExpenseReportDetails
    {
        // Private variable to hold reference to the FlexGrid control
        IContentItemProxy c1FlexGridProxy = null;
        partial void ExpenseReportDashboard_Created()
        {
            // Get an instance of the FlexGrid Control
            c1FlexGridProxy = this.FindControl("SilverlightControl");
            // Create a handler to fire when the control is actually available
            c1FlexGridProxy.ControlAvailable +=
                new EventHandler<ControlAvailableEventArgs>(c1FlexGridProxy_ControlAvailable);
        }
We use the following code in the c1FlexGridProxy_ControlAvailable method to enable grouping:
        void c1FlexGridProxy_ControlAvailable(object sender, ControlAvailableEventArgs e)
        {
            // Get an instance of the Silverlight Control
            System.Windows.Controls.UserControl objUserControl =
                e.Control as System.Windows.Controls.UserControl;
            // Get an instance of the FlexGrid Control
            C1FlexGrid c1FG = objUserControl.FindName("c1FlexGrid1") as C1FlexGrid;
            // Create a PagedCollectionView
            PagedCollectionView view = new PagedCollectionView(c1FG.ItemsSource);
            // Set Grouping on Employee
            // Use DeferRefresh to suspend notifications from the data source
            // until all the groups have been set up.
            using (view.DeferRefresh())
            {
                view.GroupDescriptions.Clear();
                view.GroupDescriptions.Add(new PropertyGroupDescription("Employee"));
            }
            // Reassign the Itemsource with the grouping
            c1FG.ItemsSource = view;
            // enable filtering on the grid
            var gridFilter = new C1FlexGridFilter(c1FG);
            // Remove handler so that it will not fire each time the
            // Tab (scree) gets focus
            c1FlexGridProxy.ControlAvailable -=
                new EventHandler<ControlAvailableEventArgs>(c1FlexGridProxy_ControlAvailable);
        }
We also add the following code to the c1FlexGridProxy_ControlAvailable method to disable filtering on the ReportTotal, and ReportDate columns:
            // Get a reference to the ReportTotal, ReportDate columns
            var ReportTotalcolumnFilter = gridFilter.GetColumnFilter(c1FG.Columns["ReportTotal"]);
            var ReportDatecolumnFilter = gridFilter.GetColumnFilter(c1FG.Columns["ReportDate"]);
            // Disable filtering on the ReportTotal, ReportDate columns
            ReportTotalcolumnFilter.FilterType = FilterType.None;
            ReportDatecolumnFilter.FilterType = FilterType.None;

When we run the application, grouping is enabled.
Expense Report Details
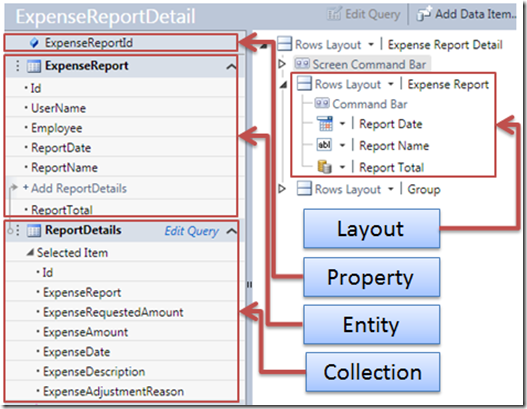
We now need to implement a screen that will allow us to edit a single expense report. We will be able to open up each expense report in a separate tab.
We create a new LightSwitch screen called ExpenseReportDetails that consists of the ExpenseReport entity and its associated ReportDetails. It also contains an ExpenseReportId property that will be used to determine what ExpenseReport entity to retrieve.
Opening the Expense Report Details Screen
We will now implement the code required to open the ExpenseReportDetail screen from the ExpenseReportDashboard screen.
We will use the following steps:
- Implement the ExpenseReportDetail_InitializeDataWorkspace method to open an existing record (or create a new one)
- Put a select button on each row of the C1FlexGrid control (on the ExpenseReports.xaml page - on the ExpenseReportDashboard screen)
- Bind the current ID to the Tag of the button
- Create an interface to open the ExpenseReportDetail screen
- Call the interface from the ExpenseReports.xaml.cs page
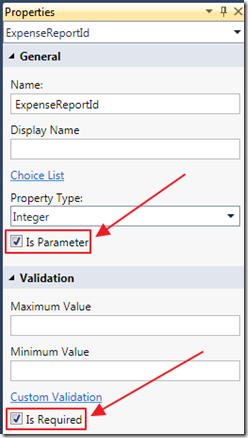
In the Properties for the ExpenseReportId parameter (on the ExpenseReportDetail screen), we check the Is Parameter box and the Is Required box. This will cause LightSwitch to automatically create a “show screen” method for the screen that will take this parameter.
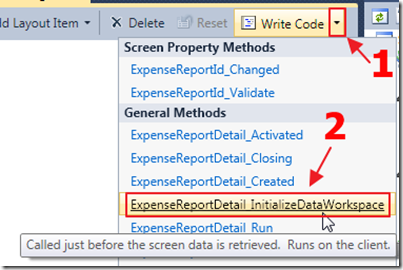
We use the Write Code selector to select the ExpenseReportDetail_InitializeDataWorkspace method.
We use the following code to implement the method:
        partial void ExpenseReportDetail_InitializeDataWorkspace
            (List<IDataService> saveChangesTo)
        {
            if (this.ExpenseReportId == -1) // -1 means new Report
            {
                // Create a new ExpenseReport
                this.ExpenseReport = new ExpenseReport();
            }
            else
            {
                // Get existing Expense Report
                this.ExpenseReport =
                    this.DataWorkspace.ApplicationData.
                    ExpenseReports_SingleOrDefault(this.ExpenseReportId);
                // Set the name of the Tab to the default field on the Entity
                this.SetDisplayNameFromEntity(this.ExpenseReport);
            }
        }
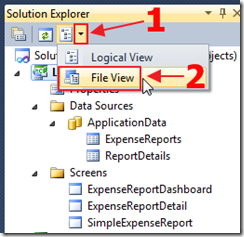
We switch to File View and add a file at ..\Common\UserCode\ExpenseReportDetails.cs with the following code:
namespace LightSwitchApplication
{
    public interface IExpenseReportDetails
    {
        void ShowExpenseReportDetails(int Id);
    }
}
This creates an interface that will take the Id of the Expense Report as a parameter. We will invoke this interface from the C1FlexGrid control (that is on the ExpenseReports.xaml page - that is on the ExpenseReportDashboard screen).
We use the following code in the ExpenseReportDetail screen to implement the interface and open the ExpenseReportDetail screen:
        void IExpenseReportDetails.ShowExpenseReportDetails(int Id)
        {
            // Open Screen            Application.ShowExpenseReportDetail(Id);
        }
We add the following code to add a Templated Colum to the C1FlexGrid control on the ExpenseReports.xaml page:
        <c1:Column ColumnName="Select" Header=" " Width="40" AllowDragging="False"
                    AllowResizing="False" AllowSorting="False">
            <c1:Column.CellTemplate>
                <DataTemplate>
                    <HyperlinkButton x:Name="SelectButton" Content="Select"
						Tag="{Binding Id}" Click="Select_Click"
                        HorizontalAlignment="Center" VerticalAlignment="Center" />
                </DataTemplate>
            </c1:Column.CellTemplate>
        </c1:Column>
This code raises the Select_Click event (in the ExpenseReports.xaml.cs page) that calls the OpenScreen method that invokes the interface:
        #region Select_Click
        private void Select_Click(object sender, RoutedEventArgs e)
        {
            // Get an instance of the Button
            HyperlinkButton objButton = (HyperlinkButton)sender;
            // Get the record Id from the Tag
            int Id = Convert.ToInt32(objButton.Tag);
            // Open the screen
            OpenScreen(Id);
        }
        #endregion
        #region OpenScreen
        private void OpenScreen(int Id)
        {
            // Get a reference to the LightSwitch DataContext
            var objDataContext = (IContentItem)this.DataContext;
            // Get a reference to the LightSwitch Screen
            var Screen =
                (Microsoft.LightSwitch.Client.IScreenObject)objDataContext.Screen;
            // Cast the LightSwitch Screen to our custom Interface
            // (that we put in the "common" project)
            var IExpenseReportDetail =
                (LightSwitchApplication.IExpenseReportDetails)Screen;
            // Call the Method on the LightSwitch screen
            Screen.Details.Dispatcher.BeginInvoke(() =>
            {
                IExpenseReportDetail.ShowExpenseReportDetails(Id);
            });
        }
        #endregion

When we run the application, a Select button appears next to each record.
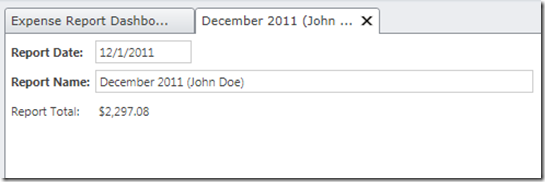
When we click the Select link, the selected record opens in the ExpenseReportDetail screen.
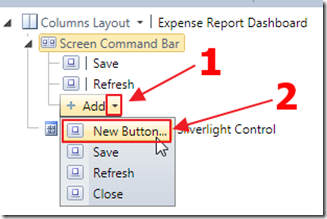
On the ExpenseReportDashboard screen, we expand the Screen Command Bar and add a New Button.
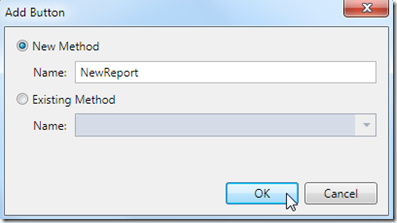
We have the button call a new method called NewReport.
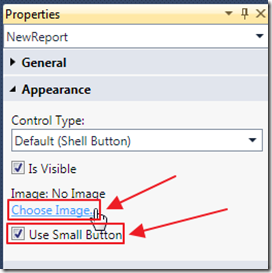
In the Properties for the button, we check the Use Small Button box and click the Choose Image button.
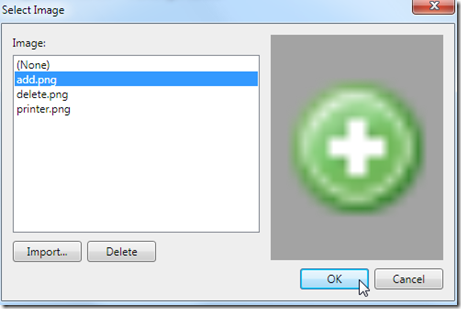
We can import and specify an image to use for the button.
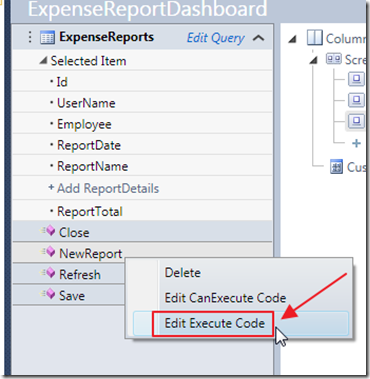
Next, we right-click on the NewReport method and select Edit Execute Code.
We use the following code for the method:
        partial void NewReport_Execute()
        {
            // Open Screen and set to a new record
            Application.ShowExpenseReportDetail(-1);
        }
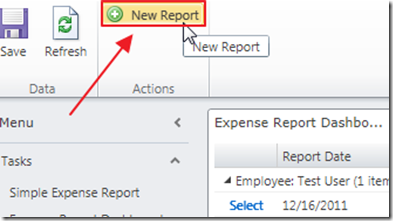
When we run the application, the New Report button will open the ExpenseReportDetail screen with a new expense report.
The ExpenseReportDetail Silverlight Control
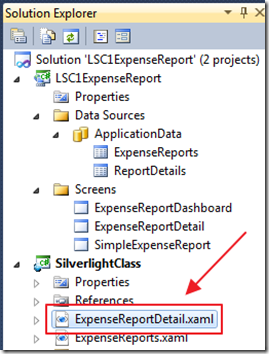
To complete the ExpenseReportDetails screen, we need to add a Silverlight control and another C1FlexGrid control.
We add a Silverlight User Control, called ExpenseReportDetail.xaml, and use the following XAML markup for the C1FlexGrid control:
<c1:C1FlexGrid  ItemsSource="{Binding Screen.ReportDetails}" HorizontalAlignment="Stretch"
                            VerticalAlignment="Stretch"
                            Name="c1FlexGrid1"
                            Background="White"
                            RowBackground="White"
                            AlternatingRowBackground="White"
                            AreRowGroupHeadersFrozen="False"
                            HeadersVisibility="Column"
                            GridLinesVisibility="All"
                            AutoGenerateColumns="False"
                            SelectionMode="Row"
                            SelectedItem="{Binding Screen.ReportDetails.SelectedItem, Mode=TwoWay}"
                            HorizontalContentAlignment="Stretch">
            <c1:C1FlexGrid.Columns>
                <c1:Column Binding="{Binding ExpenseDate, StringFormat=\{0:d\}, Mode=TwoWay}" ColumnName="Date"
                           Width="90" AllowResizing="False" Header="Date" HeaderHorizontalAlignment="Center" />
                <c1:Column Binding="{Binding ExpenseDescription, Mode=TwoWay}" ColumnName="Description"
                           Width="220" AllowDragging="False" AllowResizing="True" Header="Description"
                           HeaderHorizontalAlignment="Center" />
                <c1:Column Binding="{Binding ExpenseRequestedAmount, StringFormat=\{0:c\}, Mode=TwoWay}"
                           ColumnName="Requested Amount"
                           Width="60" AllowDragging="False" AllowResizing="False" Header="Amount"
                           HeaderHorizontalAlignment="Center" />
                <c1:Column Binding="{Binding ExpenseAdjustmentReason}" ColumnName="Adjustment"
                           Width="200" AllowDragging="False" AllowResizing="False" Header="Adjustment"
                           HeaderHorizontalAlignment="Center" Background="#FFEFEFEF" HorizontalAlignment="Center" />
                <c1:Column Binding="{Binding ExpenseAmount, StringFormat=\{0:c\}}" Width="60" ColumnName="Total"
                           Header="Total" HeaderHorizontalAlignment="Center" AllowDragging="False"
                           AllowResizing="False" Background="#FFEFEFEF" />
            </c1:C1FlexGrid.Columns>
        </c1:C1FlexGrid>

You will notice that we bind the SelectedItem in the grid to the ReportDetails.SelectedItem. This is required by code that we will later implement that needs to know what record the user has selected.
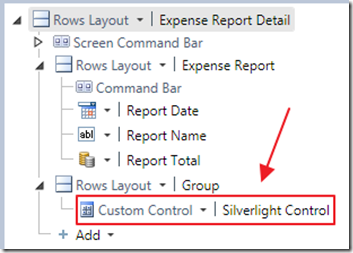
As we did with the ExpenseReportDashboard screen, we add the Silverlight Control to the screen.
We also expose a public property and wire-up an event handler to the C1FlexGrid control.
We use the following code in the method:
        void c1FlexGridProxy_ControlAvailable(object sender, ControlAvailableEventArgs e)
        {
            // Remove ControlAvailable handler -- this method is to execute only one time
            c1FlexGridProxy.ControlAvailable -=
                new EventHandler<ControlAvailableEventArgs>(c1FlexGridProxy_ControlAvailable);
            // Get an instance of the Silverlight Control
            System.Windows.Controls.UserControl objUserControl =
                e.Control as System.Windows.Controls.UserControl;
            // Get an instance of the FlexGrid Control
            c1FG = objUserControl.FindName("c1FlexGrid1") as C1FlexGrid;
            // Set the Tab to move the selection in the grid (not the focus off the grid)
            c1FG.KeyActionTab = KeyAction.MoveAcross;
        }
This code allows us to set the KeyActionTab of the C1FlexGrid control to KeyAction.MoveAcross. This allows the user to use the Tab key to navigate the cells in the C1FlexGrid control.
To add a new row to the C1FlexGrid, we add a button to the Screen Command Bar and use the following code in the method:
        partial void NewDetail_Execute()
        {
            ExpenseReport.ReportDetails.AddNew();
        }
We use the following code to delete a row (and show a confirmation pop-up dialog box):
        partial void DeleteDetail_Execute()
        {
            if (ReportDetails.SelectedItem != null)
            {
                MessageBoxResult result = this.ShowMessageBox("Are you Sure?",
                    "Delete Record", MessageBoxOption.OkCancel);
                if (result == System.Windows.MessageBoxResult.OK)
                {
                    ReportDetails.SelectedItem.Delete();
                    this.DataWorkspace.ApplicationData.SaveChanges();
                    ReportDetails.Refresh();
                }
            }
        }
Deleting an entire expense report (rather than just an expense report detail) is a bit more complicated because we also want to remove it from the ExpenseReportDashboard screen (if it is open).
We use the following code for the method:
    partial void DeleteReport_Execute()
    {
        if (ExpenseReport != null)
        {
            MessageBoxResult result = this.ShowMessageBox("Are you Sure?",
                "Delete Record", MessageBoxOption.OkCancel);
            if (result == System.Windows.MessageBoxResult.OK)
            {
                // Delete the Report
                ExpenseReport.Delete();
                // Save the changes
                this.DataWorkspace.ApplicationData.SaveChanges();
                // Get a reference to the ExpenseReportDashboard screen (if it is open)
                Microsoft.LightSwitch.Client.IActiveScreen searchScreen =
                    Application.ActiveScreens.Where(a => a.Screen is ExpenseReportDashboard).FirstOrDefault();
                if (searchScreen != null)
                {
                    searchScreen.Screen.Details.Dispatcher.BeginInvoke(() =>
                    {
                        // Refresh the list on the ExpenseReportDashboard Screen
                        ((ExpenseReportDashboard)searchScreen.Screen).ExpenseReports.Refresh();
                    });
                }
                // Close this Screen
                this.Close(false);
            }
        }
    }
Printing the FlexGrid

The C1FlexGrid control contains methods that allow for easy printing.
We simply place a button on the ExpenseReportDetail.xaml page, and use the following code to print the grid:
        private void btnPrint_Click(object sender, RoutedEventArgs e)
        {
            // Print the Grid
            var scaleMode = ScaleMode.PageWidth;
            objC1FlexGrid.Print("MyReport", scaleMode, new Thickness(96), 20);
        }
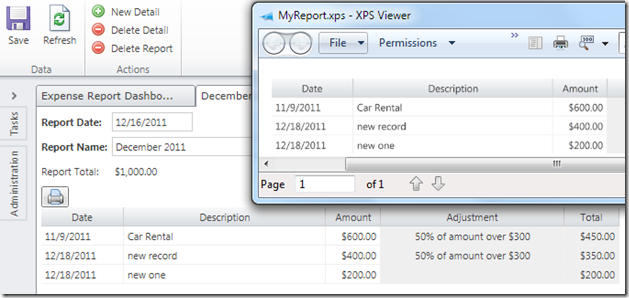
Summary of the C1FlexGrid Control
ComponentOne FlexGrid allows complete control of the look and functionality of the data grid, and provides additional features not found in the built-in LightSwitch data grid, such as:
- Client-side filtering
- Grouping
- Printing
Resources
This article barely scratches the surface as to what the C1FlexGrid control can do. You can find the full documentation here:
http://helpcentral.componentone.com/nethelp/C1flexgridsilverlight/
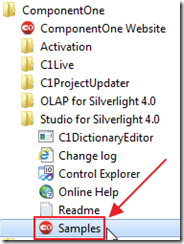
When you install ComponentOne Studio for Silverlight, it will install a link to Samples that provide many examples with source code.
You can see the online demos here:
http://www.componentone.com/SuperProducts/FlexGridSilverlight/Demos/
Download Code
The LightSwitch project is available at http://lightswitchhelpwebsite.com/Downloads.aspx
4 comment(s) so far...
wrong link to download sample.
By msr on
1/8/2012 11:33 PM
|
@msr - The link is fixed.
By Michael Washington on
1/9/2012 6:35 AM
|
Hi Micheal,
Do you think it is possible for you to try getting the Telerik DataGrid to work in LightSwitch? I would be much obliged to you.
Best Regards,
Kelly
By Kelly on
2/14/2012 1:11 PM
|
@Kelly - ComponentOne 'sponsored' this article (this is very helpful because it allows me to devote time to writing articles for this site) and is 'sponsoring' additional articles so I am slammed for the time being.
Also, this site allows all the component vendors to post blogs so hopefully Telerik will post an article.
By Michael Washington on
2/14/2012 1:38 PM
|