Aug
6
Written by:
Michael Washington
8/6/2011 8:38 PM

Note: You must have Visual Studio Professional (or higher) to complete this tutorial
Telerik has a differentiating LightSwitch control in their Rich Text Editor Control. It allows you to create compelling LightSwitch applications. It allows your end-users to create, import and export Microsoft Word documents. It also contains many other features.
In this example, we will build a small application that allows rich notes to be entered for people.
First, Install the Telerik controls for LightSwitch available here: http://www.telerik.com/products/lightswitch-support.aspx.

We create a New Project.

We call it TelerikNoteTaker.

We add a table.

We add a NoteTaker_People table with the schema above

We clear the length of the Notes field (this sets it to unlimited) because the XAML markup is large.
We also un-check the Display As Default because we do not want it to display in the automatic popup that LightSwitch will create to allow us to edit the data in the table. We only want to edit the name not the notes in the automatic popup that LightSwitch creates.

We add a Screen.

We create a List and Details Screen.

The Screen will show.

We click on the List Column…

We set the Properties according to the image above.

We right-click on the Name column and Delete it (we can enter a name and edit it in the popup that will automatically be created)

We hit F5 to run the application.

We enter some sample data.
We then close the application.
Create The Custom Control
While it is possible to directly implement any Silverlight control in LightSwitch (my book, Creating Visual Studio LightSwitch Custom Controls (Beginner to Intermediate), covers all the methods and the syntax to use), it is actually easer and requires less code, to simply create a Silverlight Custom Control (a .xaml page), and then put the Silverlight control that you want to implement on that .xaml page.

Create a New Project.

Create a Silverlight Class Library called SilverlightControls.

Make it Silverlight 4 (or higher).

Delete the Class1.cs file that is automatically created.

Add the following references to the Silverlight project:
- System.Windows.Browser.dll
- Main Telerik Assemblies
- Telerik.Windows.Controls.dll
- Telerik.Windows.Controls.ImageEditor.dll
- Telerik.Windows.Controls.Input.dll
- Telerik.Windows.Controls.Navigation.dll
- Telerik.Windows.Controls.RibbonBar.dll
- Telerik.Windows.Controls.RichTextBoxUI.dll
- Telerik.Windows.Data.dll
- Telerik.Windows.Documents.dll
- Format providers for export/import
- Telerik.Windows.Documents.FormatProviders.Html.dll
- Telerik.Windows.Documents.FormatProviders.MsRichTextBoxXaml.dll
- Telerik.Windows.Documents.FormatProviders.OpenXml.dll
- Telerik.Windows.Documents.FormatProviders.Pdf.dll
- Telerik.Windows.Documents.FormatProviders.Rtf.dll
- Telerik.Windows.Documents.FormatProviders.Xaml.dll
- Spell Checking
- Telerik.Windows.Documents.Proofing.dll
- Telerik.Windows.Documents.Proofing.Dictionaries.En-US.dll
Note: Install the Telerik controls for LightSwitch here: http://www.telerik.com/products/lightswitch-support.aspx

Add a New Item.

Add a new Silverlight control and name it TelerikEditor.xaml.

We change the DesignHeight to 600 x 800 and zoom out to 50%.

From the Visual Studio Toolbox, we drag the RadRichTextBox control, and drop it on the design surface.

A configuration wizard will show.
We choose Text Box or Rich Text Box. This option will allow us to select a DataProvider needed to allow us to save data in LightSwitch.
The way the RadRichTextBox control works, is that it simply shows data supplied by the DataProvider that is attached to it. This allows the same control to show XAML (viewable in Silverlight and WPF), HTML (viewable on a normal web page), RTF (Microsoft Word format), or plan Text.

The next screen will allow us to select the DataProvider.
In this example we will choose XAMLDataProvider because the content will only be shown in Silverlight. If we wanted to show the content on a regular web page we would choose the HTMLDataProvder.
For a full discussion of DataProviders see:
http://www.telerik.com/help/silverlight/radrichtextbox-features-data-providers.html

Click Finish.

This will create the RadTextBox.

We then hover the mouse on the left-side blue bar…

…and click on it.

This will add two rows to the page.

If we look at the XAML markup for the RadRichTextBox control, it will resemble the image above.
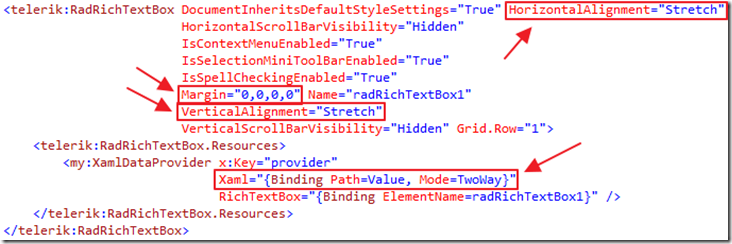
We then make the following changes:
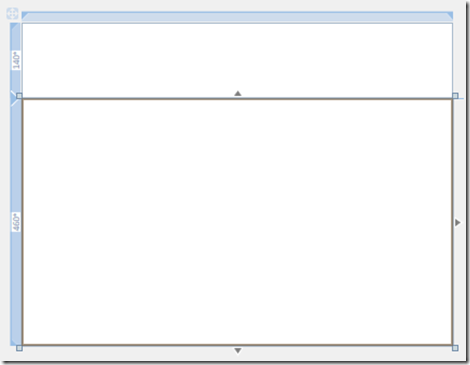
The design surface will now resemble the image above.
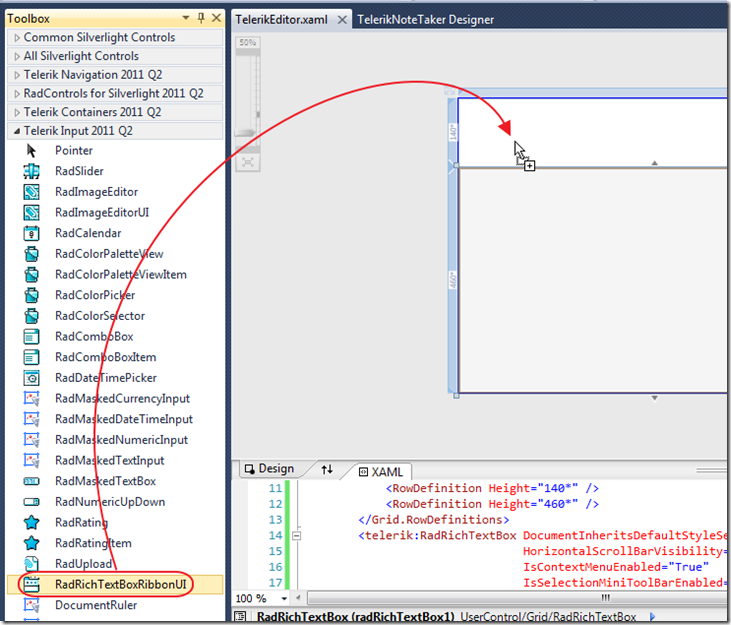
From the Visual Studio Toolbox, we drag the RadRichTextBoxRibbonUI control and drop it on the design surface.
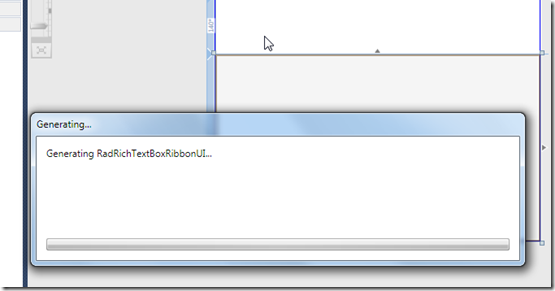
You will see a box pop up while the Telerik control generates the XAML markup.
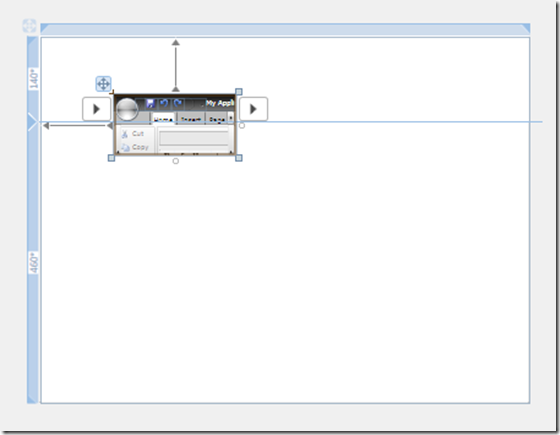
The screen will resemble the image above.

The XAML markup will resemble the image above.

Change the XAML markup to resemble the image above.
- Remove the Height and Width settings
- Set the Margins to 0
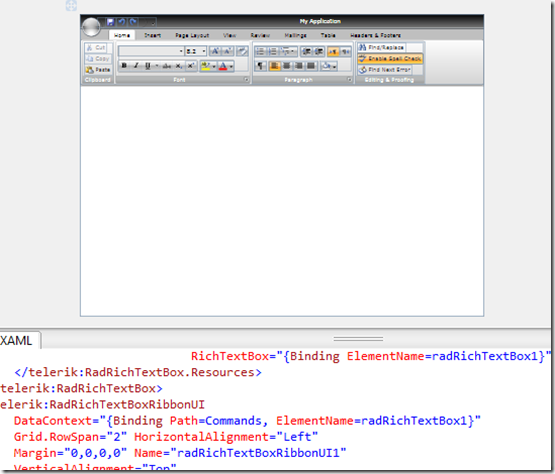
The screen will resemble the image above.
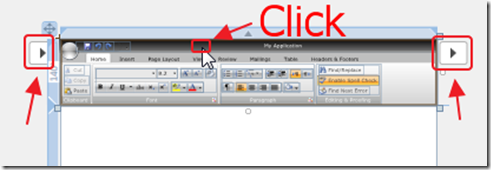
You will note that if you click on the Ribbon Bar control in the Visual Studio editor, additional configuration buttons will appear.
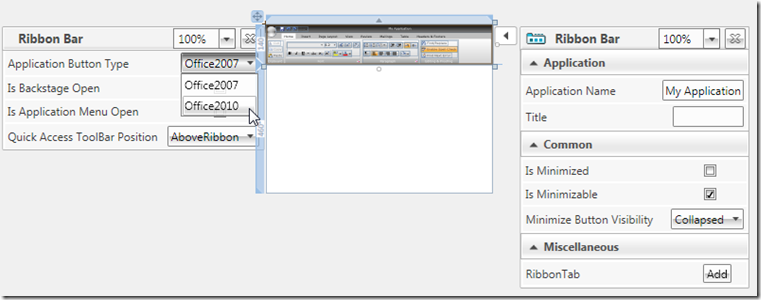
Each configuration button will display a menu that allows additional configuration.
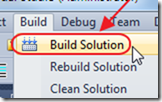
Build the Solution.
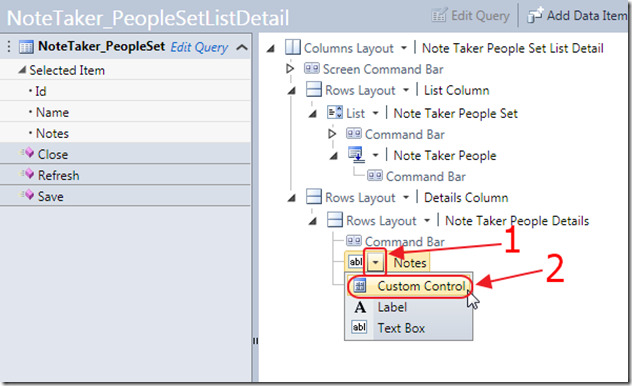
In the LightSwitch screen editor, change the Notes TextBox to a Custom Control.
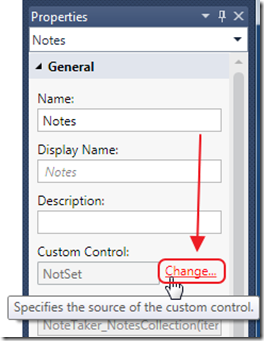
Click Change in the Properties for the Custom Control.
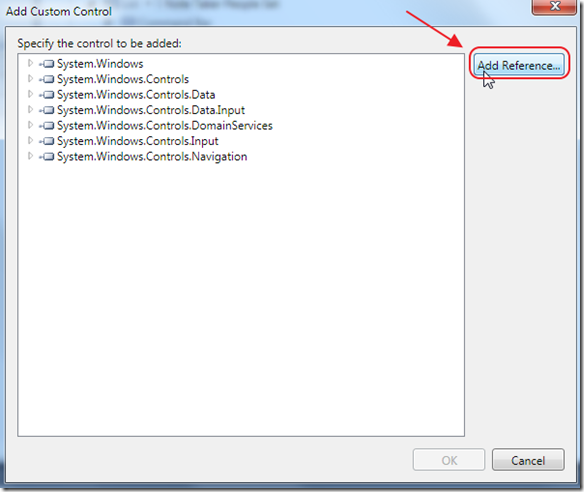
Select Add Reference.
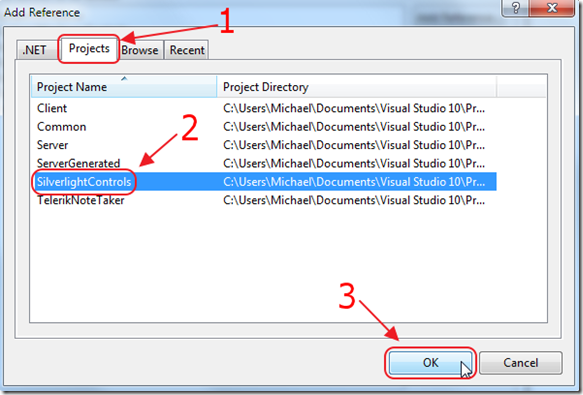
Select the Projects tab and then select the SilverlightControls project.
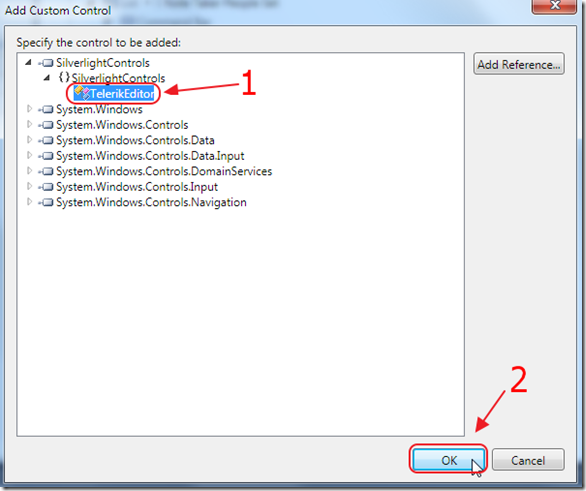
This will allow us to select the TelerikEditor control.
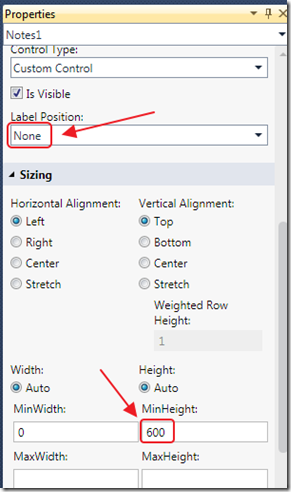
In the Properties for the Custom Control, set the Label Position to None and the MinHeight to 600.

If you try to run the project at this point, you will get an error.
The Telerik assemblies (the .dll’s) need to be added to the LightSwitch project.
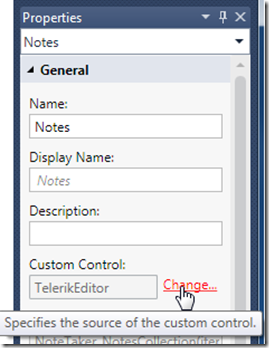
In the Properties for the Custom Control, click Change again.
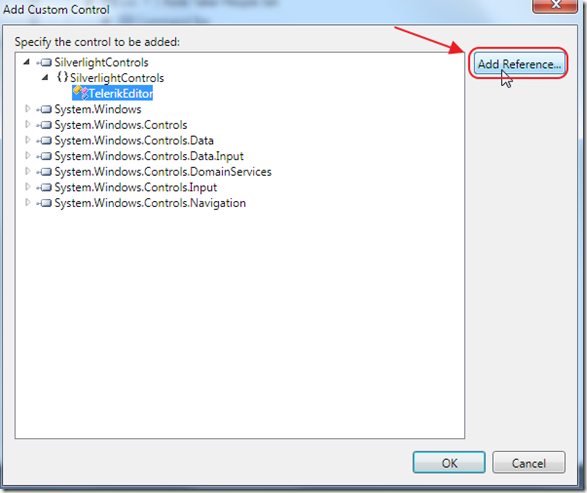
Click Add Reference.
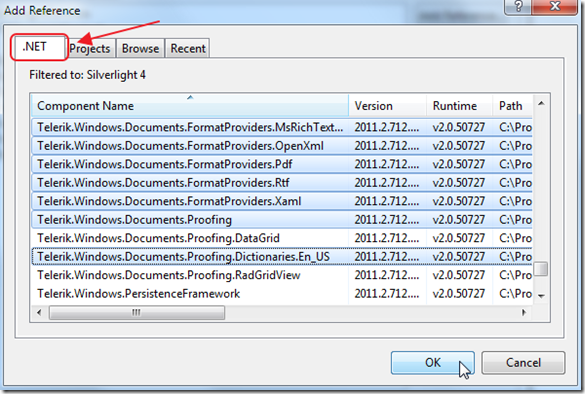
We select the .Net tab, and we add the references we added earlier and click the OK button.
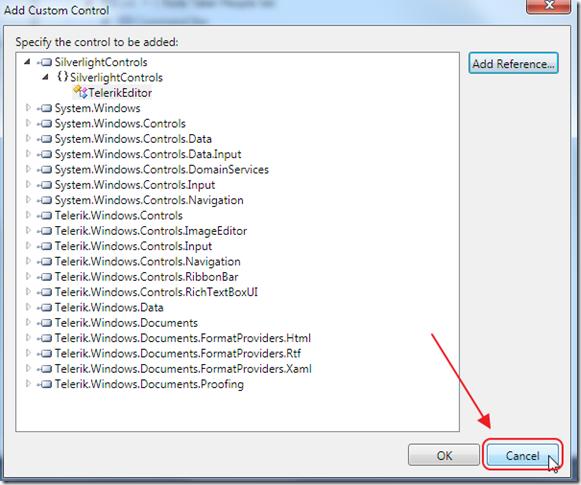
Click Cancel on the Add Custom Control box (we did not want to change any configuration on the custom control, we only wanted to add references) .

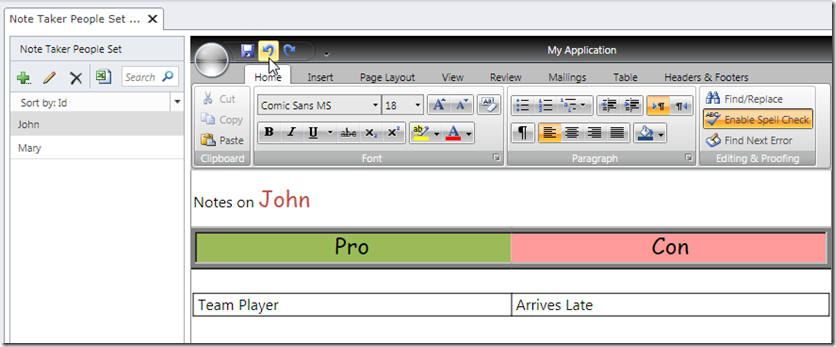
When we run the application, we now have a full featured rich text editor that allows us to open and save Microsoft Word documents and even has undo and redo buttons.
Download Code
The LightSwitch project is available at http://lightswitchhelpwebsite.com/Downloads.aspx
24 comment(s) so far...
Thanks for the post . It really helped me. I have question in the custom control you used the Binding with Value property. What my understanding was that we must bind it with Screen.ViewModelProperty
I am confused when to use which approach.
Can you help me with this.
Regards
Goldy
By goldytech on
8/7/2011 11:24 PM
|
Thanks, this is great, I will try it out.
Francis
By Francis on
8/8/2011 2:24 AM
|
@goldytech - I explain all the binding methods in my book: http://lightswitchhelpwebsite.com/Market/LightSwitchCustomControls.aspx
By Michael Washington on
8/8/2011 4:52 AM
|
Excellent blog. Many thanks!
By Garth Henderson on
8/8/2011 4:17 PM
|
@Garth Henderson - Thanks Garth!
By Michael Washington on
8/8/2011 5:24 PM
|
Worked like a charm with external sql table.
Excellent post, many thanks.
Francis
By Francis on
8/9/2011 6:17 AM
|
@Francis - I am happy it worked. Thank you for posting a message.
By Michael Washington on
8/9/2011 6:18 AM
|
Michael
You have done it again. Thanks this step by step instruction has saved me countless hours.
I have a question about your book. TOC looks great for my level of experience. Do you plan on adding more sections over the next month? If so will the people that have purchased the ebook for download be able to get the updated version?
Thanks again!
Cliff
By Cliff McManus on
8/27/2011 11:50 AM
|
@Cliff McManus - The E-Book is also a print book, so it is complete.
By Michael Washington on
8/27/2011 11:51 AM
|
Downloaded the example, entered text etc into the texteditor but lightswitch does not recognise the changes.
By Shaun on
9/7/2011 3:11 AM
|
@Shaun - The example only works if you put in a small amount of text. To put in more text would require you to connect to an external table that has the length set at NText or NvarChar(max).
By Michael Washington on
9/7/2011 4:13 AM
|
Thanks, figured out the problem, not sure why but I had to move the xaml databinding out of the richtextbox resource and put it above the richtextbox. According to the telerik forums this is the way to do it. Thanks for the great site, really learning alot from you.
By Shaun on
9/7/2011 6:36 AM
|
thanks for this i changed it around a little to create a smaller html text editor.
By kevin on
9/26/2011 2:24 PM
|
I downloaded the Telerik trial package and have attempted to replicate your walk-through. But when i click "Finish" on the RichTextBox Wizard for adding the control, an error is thrown at Line 0: Position: 0 (Of what I know not) with the message "Object reference not set to an instance of an object."
I have double checked that I have added all of the references identified in the walk-through, and I have scoured the Telerik forums but not have found anything that suggests what is going wrong.
Have you encountered this? And a possible resolution?
(Also, I have had a number of problems on the Telerik site with demos that won't load, or even blow up with errors referencing various lines of code.) (I have Vista, Studio 2010 SP1, Firefox 7).
Thank you.
Ken
By Kenneth James on
10/4/2011 12:21 PM
|
@Kenneth James - You can download the complete code on the Download page on this site.
By Michael Washington on
10/4/2011 12:21 PM
|
I wished that Micheal had done this article earlier this year.. oh wait.. LS Release (2011) might not have been out yet by then.. otherwise I wouldn't have to figure out these things all on my own last March. Thank God it worked then!
But now I'm having problems porting it into LS 2010.. the two-way binding works fine.. but, since I hosted/nested the Telerik Rich Text Box Control in a RadWindow, the window size didn't come out right by default. The height of the RadWindow is about one and a half inch tall and the width is, as if set to stretch to infinity. When maximized, the RadWindow managed to correctly occupy all available display space of the LS application.
I had no such problem with LS Beta 1 (the RadWindow-hosted Telerik Rich Text Box came out just nice in terms of size). What's changed in LS 2011 (in terms of control size/layout handling)?
Hope somebody could help me with this. Thanks.
By Faris Wong on
11/22/2011 2:41 AM
|
@Faris Wong - You can download my example and see how I set the sizing.
By Michael Washington on
11/22/2011 5:34 AM
|
Hi, First off - your posts are fantastic and I bought your book earlier today!
I have a Lightswitch application with an external database that stores information about companies and products. A product description field contains text with HTML formatting tags. I've been trying to use the above example to help me use a Telerik Rich Text control to view and edit this field but I've not managed it. Is there something I need to do or configure to make the telerik control read and write only HTML?
I have succeeded in getting the above example to work in a project of it's own. I also managed to have the telerik control to write to the external db field, but this is where I noticed that it wasn't HTML and that it only reads and displays the fields it had written.
Thanks,
By William Hadden on
11/23/2011 9:11 AM
|
@William Hadden - Thank you for he support. You can programatically manipulate the control to read and write HTML. I will have a tutorial on how to do it in the next few weeks. Meanwhile you can go to the Telerik site with any questions.
By Michael Washington on
11/23/2011 9:13 AM
|
Hi,
I managed to get this working after looking at the Telerik documentation and with a bit of help from another developer. It was a tiny change to the control's Xaml file - here's how we did it.
If you follow your example but in the TelerikEditor.xaml replace the namespace entry near the top
From:
xmlns:my="clr-namespace:Telerik.Windows.Documents.FormatProviders.Xaml;assembly=Telerik.Windows.Documents.FormatProviders.Xaml">
to:
xmlns:my="clr-namespace:Telerik.Windows.Documents.FormatProviders.Html;assembly=Telerik.Windows.Documents.FormatProviders.Html">
and then the change the my:XamlDataProvider
From:
To:
Hope this is useful to someone!
By William Hadden on
11/24/2011 3:56 AM
|
Hi Michael,
Great Help. Could you please provide a sample how can we merge some table data in to the document using RTB?
Eg. A letter format from the template and merge with address data and saving in to the database.
Regards
Rama
By Rama on
12/23/2011 5:46 PM
|
Hello,
I got all the way down to "The Telerik assemblies (the .dll’s) need to be added to the LightSwitch project.".
When I try to add the Telerik references it crashes Visual Studio.
I'm using Visual Studio 2012 update 2; Silverlight 5
Got any ideas?
By JohnMarsing on
5/1/2013 9:54 AM
|
@JohnMarsing - Sorry this blog post is two years old. You will want to find a more recent example.
By Michael Washington on
5/1/2013 10:27 AM
|
I think I will try the ComponentOne solution.
I see you have a blog on that....
http://lightswitchhelpwebsite.com/Blog/tabid/61/EntryId/156/Component-One-LightSwitch-Studio.aspx
By JohnMarsing on
5/1/2013 10:36 AM
|