Sep
9
Written by:
Michael Washington
9/9/2010 9:30 PM


With a little code you can get LightSwitch to do almost whatever you want. For an application I am working on, I wanted a screen that would display information about the current user.
What is unique about this particular requirement, was that I wanted to display a page that was not associated with a Table of data. I just wanted a screen to show, and display code that I wrote.
The code will show the current user, if they are authenticated, and what the authentication type that the application is using.
Set Up Authentication in LightSwitch

First step, double-click on Properties in the Solution Explorer.

Next, select Access Control, Use Forms authentication and check the Granted for debug box.

When you Hit F5…

You will be able to create Users, and Roles.
Stop the application and return to Visual Studio.
Create The Page

In the Solution Explorer, right-click on Screens and select Add Screen…

- Select New Data Screen
- Enter HomePage for Screen Name
- Click OK

When the screen opens up, click Add Data Item…

- Select Local Property
- Select String for Type
- Enter Name for Name
- Click OK

Name will show in the list.
Repeat the same process and add the following Properties:

FullName IsAuthenticated AuthenticationType 
We do not need the standard Save and Refresh buttons on this page. Right-click on Screen Command Bar and select Delete.

Screen Command Bar will remain but the buttons will be deleted.

Drag and drop the Name field on the page.

You can also use the Add button to add the fields.

Repeat the process, adding all the other Properties.
Write Custom Code

Select Write Code then HomePage_Created.
The code window will show.
Add the following code:
    Microsoft.LightSwitch.Security.IUser currentUser = this.Application.User;
    if (currentUser != null)
    {
        this.Name = currentUser.Name;
        this.FullName = currentUser.FullName;
        this.IsAuthenticated = currentUser.IsAuthenticated.ToString();
        this.AuthenticationType = currentUser.AuthenticationType.ToString();
    }
Save the code and close the code window (very important, otherwise you will get an error when you try to run the application).

In the Solution Explorer, go into Properties.
Click on Screen Navigation, click on HomePage, and click Set, to set it as the Startup Screen.
Customize Screen

When you run the application, the Properties will show, but they will show the values in TextBoxes.
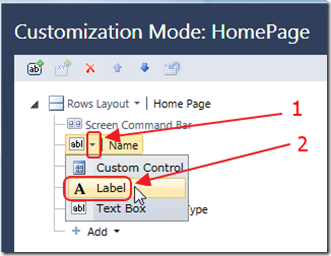
Click the Customize Screen button.

Click on the Name TextBox and select Label.
Repeat the process for the other controls.
Click the Save button (in the upper right hand corner of the screen).

The page is compete.
Further Reading
Authentication Features in Visual Studio LightSwitch
Using application permissions in Visual Studio LightSwitch
Filtering data based on current user in LightSwitch apps
9 comment(s) so far...
Wow, very nice article! I already love lightswitch.
By Jan on
9/10/2010 4:21 AM
|
Saweet!
By Paul Patterson on
9/11/2010 4:13 AM
|
THANK YOU!!!!
By Pascal Mettey on
9/11/2010 4:14 AM
|
Great thanks.
By Francis on
4/19/2011 6:26 AM
|
Michael, Good start. Very helpful both here and in the LightSwitch forums. Thanks, from across the pond. Keith
By Keith_Watford,UK on
5/4/2011 12:18 PM
|
Michael,
how easy would it be to apply the style, appearance and functionality of an existing Masterpage to your Home Page?
Regards,
Ray
By Ray Boyle on
7/16/2012 5:12 AM
|
@Ray Boyle - This article describes a Silverlight screen not a HTML page so the style is controlled by the Theme installed at the time.
By Michael Washington on
7/16/2012 5:13 AM
|
Michael,
Things aren't the same in a HTML Client.
What would you have to do have this show on a HTML Client screen in lightswitch?
Regards,
Ken
By Ken on
4/19/2013 5:53 AM
|
@Ken - You can basically do the same thing. Sorry I have no examples.
By Michael Washington on
4/19/2013 7:56 PM
|