Jun
27
Written by:
Michael Washington
6/27/2012 4:46 PM


NOTE: This article uses the preview version of the LightSwich HTML Client. You can download it here: http://msdn.microsoft.com/en-us/lightswitch/htmlclient.

In this article we will look at creating a simple application using the LightSwitch HTML Client.

We open Visual Studio and select New Project.

We select LightSwitch Application JS/C#.

The project will open.

First, we need to create or connect to data.
We right-click on Server and select Add Table.

We create a simple table.

We Save (frequently).

We now want to create the user interface (the HTML pages).
We right-click on Client and select Add Screen.

We create a Browse Data Screen.

The Screen will display in the designer.

The page will show records, however we need to make an interface to add records. First we will create a popup that will allow us to add records, next we will make a button that will open the popup.
We right-click on the Dialogs section and select Add Dialog.

A group will be created.
We click on the group, and change its Display Name to Add Person.

Next, we select the Add drop down, and choose Selected Item.

Text boxes for all the properties in the People entity will appear.

In the Properties for the Dialog, we set the Height to Stretch to Container.

To add a button to open the popup, we first click on the Rows Layout for the Person List.
The Add drop down will appear. We click the drop down and select New Button.

In the Add Button configuration dialog box, we select AddAndEditNew.

We then set the Navigate To to Add Person.

We drag the button above the People List.

In the Properties for the button, set the Display Name to Add, and the Horizontal Alignment to Right.

We click Start to run the program at this point.

We can click the Add button to add new records.

Binding, saving, and validation are automatically wired-up.
Navigating Pages

We close the web browser to stop the program, and we return to Visual Studio.
We right-click on Client and select Add Screen.

We create a Add/Edit Details Screen.

The Screen will show.

We will now make a link that will open the PersonDetail screen when you click on a Person.
We double-click on the BrowsePeople screen in the Solution Explorer, to open it.
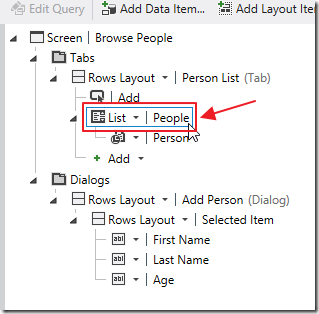
When the screen opens, we click on the People List.
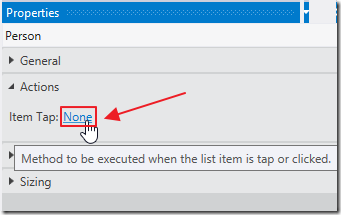
In the Properties, we click on the Item Tap action link.
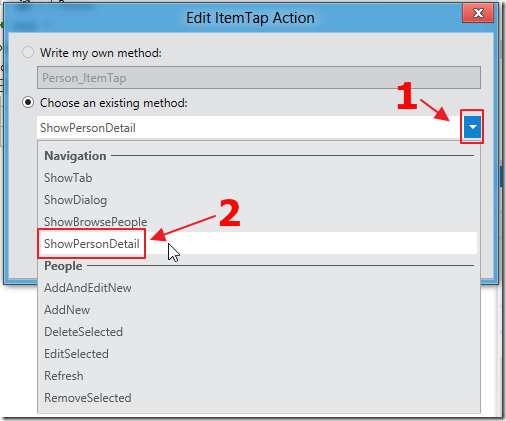
When the Edit ItemTap Action dialog box shows, we choose ShowPersonDetail under navigation (this option exists because we created the PersonDetail screen in the previous step).
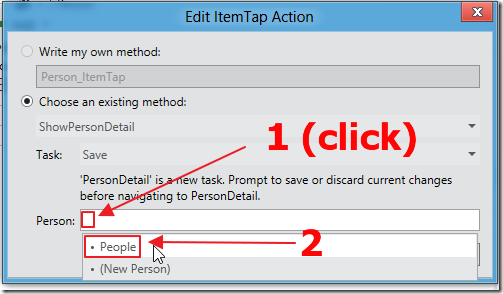
We have to pass a parameter (the selected person) to the PersonDetail screen.
We click in the Person: box and select People.
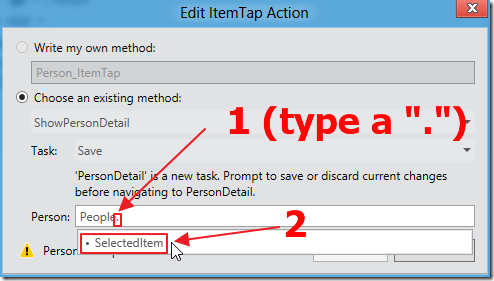
We type a period, and then choose SelectedItem (to pass the currently selected Person in the List Box as a parameter to the ShowPersonDetail screen).
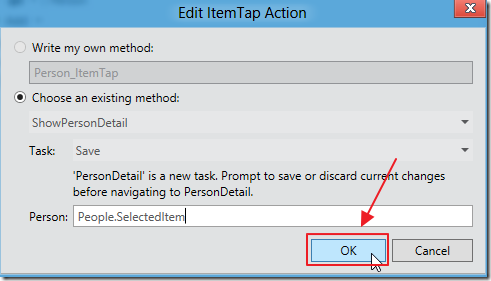
We click OK.
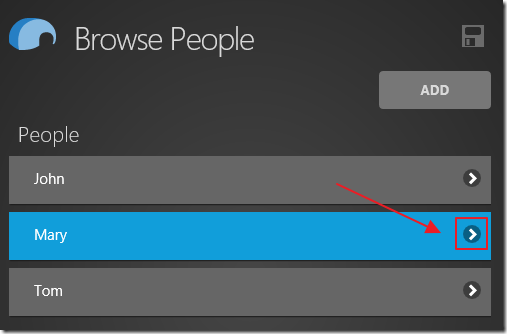
When we run the application, we can click on a Person…
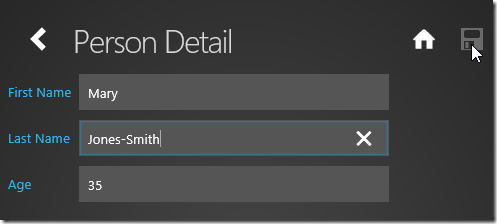
And navigate to a screen that allows us to edit them.
Download The Code
Download the code at: http://lightswitchhelpwebsite.com/Downloads.aspx
13 comment(s) so far...
Thanks for the tutorial on getting our feet wet with this preview. Is there any way however to convert our already built C# Silverlight LightSwitch application into this HTML5 version?
By yudhistre on
6/28/2012 4:50 PM
|
@yudhistre - You can add the HTML client to an existing LightSwitch project.
By Michael Washington on
6/28/2012 7:45 PM
|
Thanks Michael, it's always a pleasure reading your articles.
This new feature opens a whole new world in lightswitch use, imho, hope it will be correctly supported by Microsoft (read: hope it will really work correctly with the various browsers)
Have a good day
Samuele
By Samuele on
7/6/2012 7:22 AM
|
@Samuele - It will use JQuery Mobile for browser compatibility.
By Michael Washington on
7/6/2012 7:34 AM
|
Thanks - It looks great.! will this "mixed" (VB/JS) be available in vs2012 & w8 RTM? If not when is it likely to be available
By pp8357 on
8/21/2012 6:07 PM
|
@pp8357 - I have no idea how long it will take before this is released.
By Michael Washington on
8/21/2012 7:54 PM
|
hi
I try to run your sample project but it runs in newer version of visual studio then i check project file and seen your LightSwitchProjectVersion is version 3 and my LightSwitchProjectVersion is version 2.6 . should i Upgrade something ?
Visual studio 2012 update 1
html preview client 2
By alireza naeimi on
2/9/2013 12:29 AM
|
@alireza naeimi - There is a LightSwitch HTML Client Preview 2 that I am using.
By Michael Washington on
2/9/2013 5:44 AM
|
Hi Michael,
Is there a way to show new/edit screen as the Home screen in LightSwitch HTML?
By Arun Kumar Asirvatham on
2/23/2013 6:34 AM
|
@Arun Kumar Asirvatham - Not that I know of.
By Michael Washington on
2/23/2013 6:34 AM
|
Hi,
We have an existing Application in LS 2012 which conatins 45-50 screens.
If I install the preview 2 version, would my existing screens get rendered as HTML 5 or do I have to create all the screens in the HTML client?
By Mamata on
3/7/2013 12:46 PM
|
@Mamata - You have to create all the HTML Screens.
By Michael Washington on
3/6/2013 5:13 AM
|
Great tutorial!
By eduardo on
5/13/2013 3:22 PM
|